Want to Add Columns to your Google Docs Document? Read here!

There are a number of writing platforms you can choose from for composing a document with MS Word and Google Docs being the prime options. For most professional documents such as research papers, essays, or theses, Google Docs is usually preferred due to its easy access and sharing ability.
This means that Google Docs offers the ability to conveniently share and edit a document by multiple people simultaneously, saving each change made on auto, thereby, eliminating the need for constant saving and sharing. There are also numerous formatting tools that the application offers such as text boxes, hanging indents, sub and superscripts, and columns in Google Docs.
With the help of these tools, not only can you create professional documents but also informative pamphlets or leaflets such as brochures and advertisements. For creating content that is visually appealing, usually for attracting potential clients and customers, one must have a good amount of knowledge about the afore-mentioned formatting tools and options along with plenty others.
In this article, you can learn how to make columns in Google Docs. This formatting option can be beneficial for a variety of outlines. It can be used when one is detailing a comparison of two products or services, or in order to create a more cohesive appearance for the document. The option was not available when Google Docs was first released. However, with the increasing suggestions and demand, the tool is now accessible.
Here is how you can form columns in Google Docs and write in these columns:
Contents
How to Create Columns in Google Docs?
a. Columns in Google Docs – Entire Document
Following is a step-wise guide on how you can add a second column to your entire Google Docs document:
- Open your document in Google Docs through your Google Drive or create a new document from scratch after opening Google Docs.
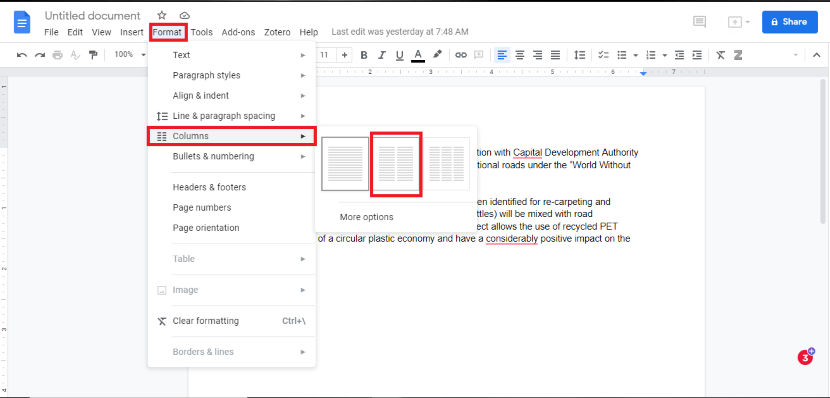
- From the menu bar, select “Format”.
- A drop-down menu will open, hover on “Columns”.
- A side menu will show you options for the types of columns available. You can choose the one that is in accordance with your preference.
- Once you select the column format, you can write inside the particular outline for your entire document.
- You can also choose to change the dimensions of your columns through the ruler at the top of your document.
a. Columns in Google Docs – A Portion of the Document
If you wish to only add a second column to only a portion of your Google Docs document, you can follow these steps:
- Open your document in Google Docs through your Google Drive or open a blank document.
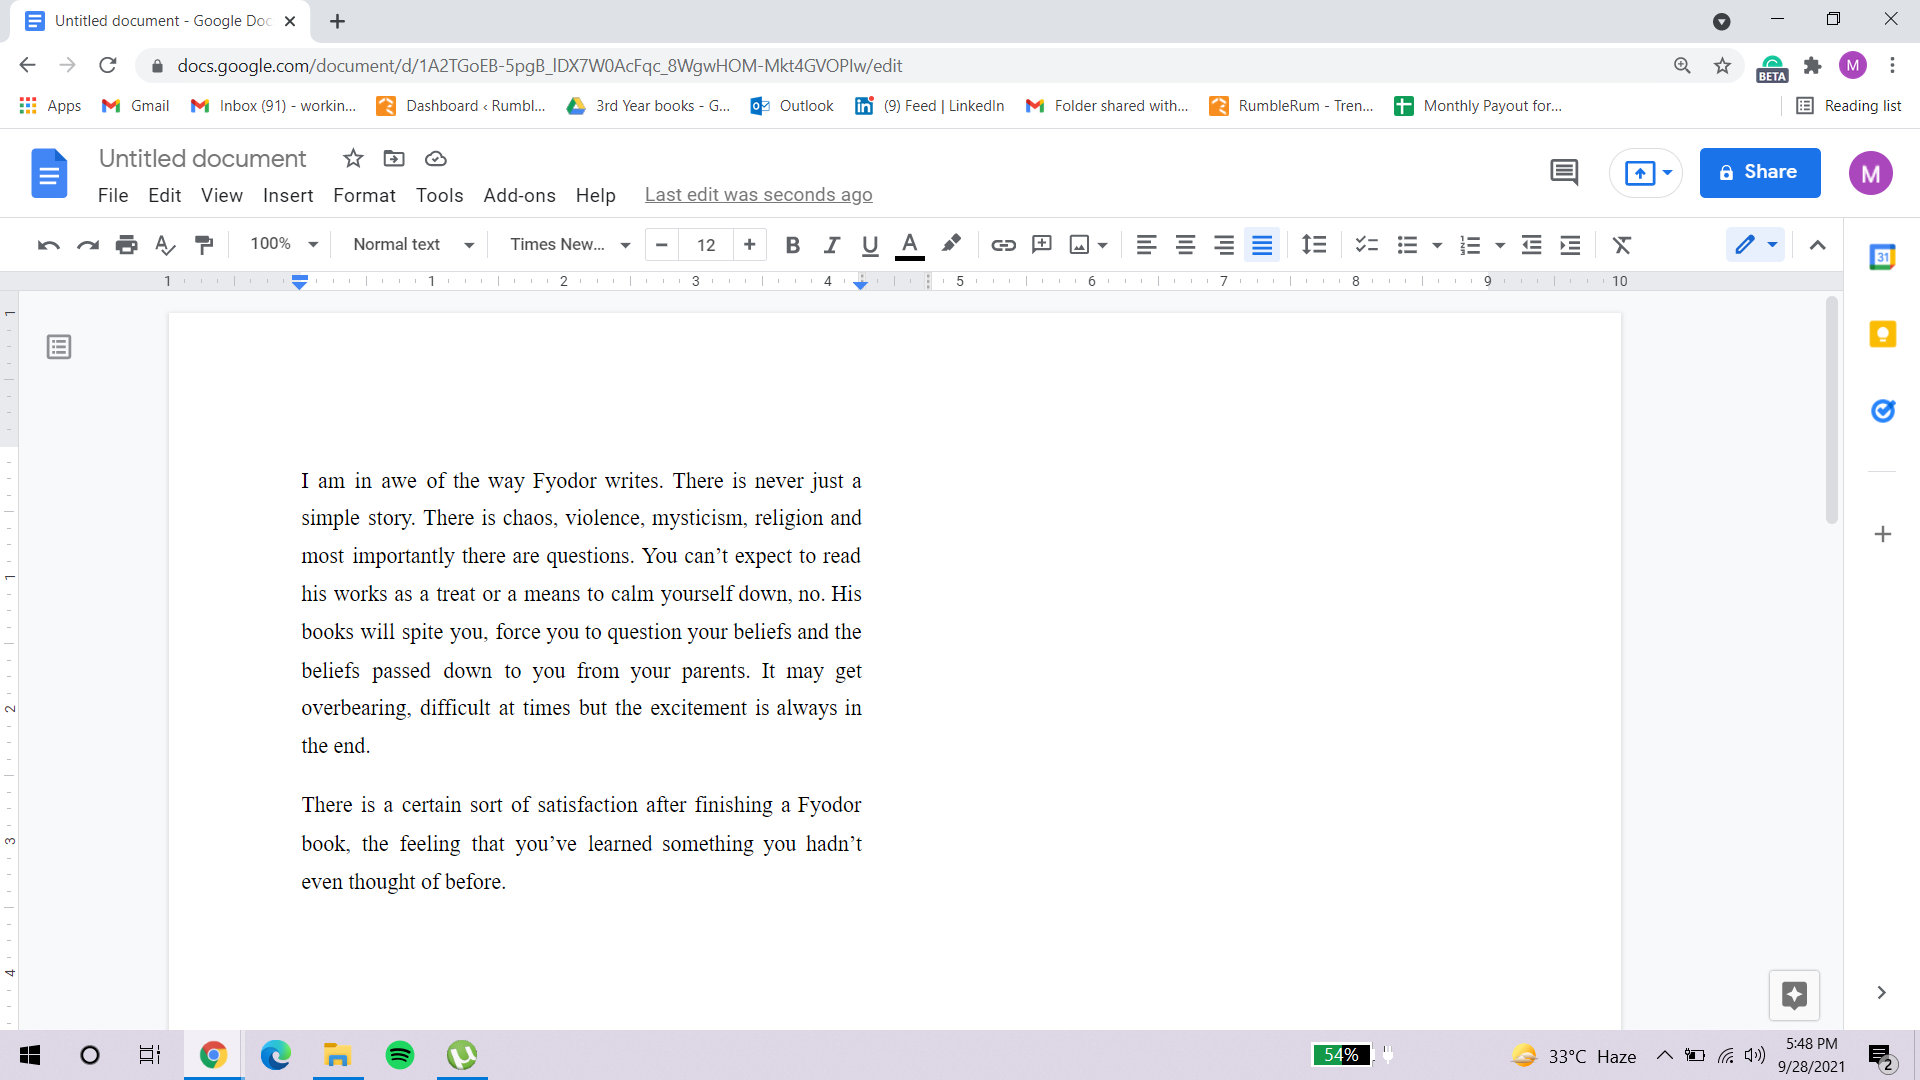
- Write your entire content or select the pre-existing paragraph that you wish to add the columns to by highlighting that specific portion.
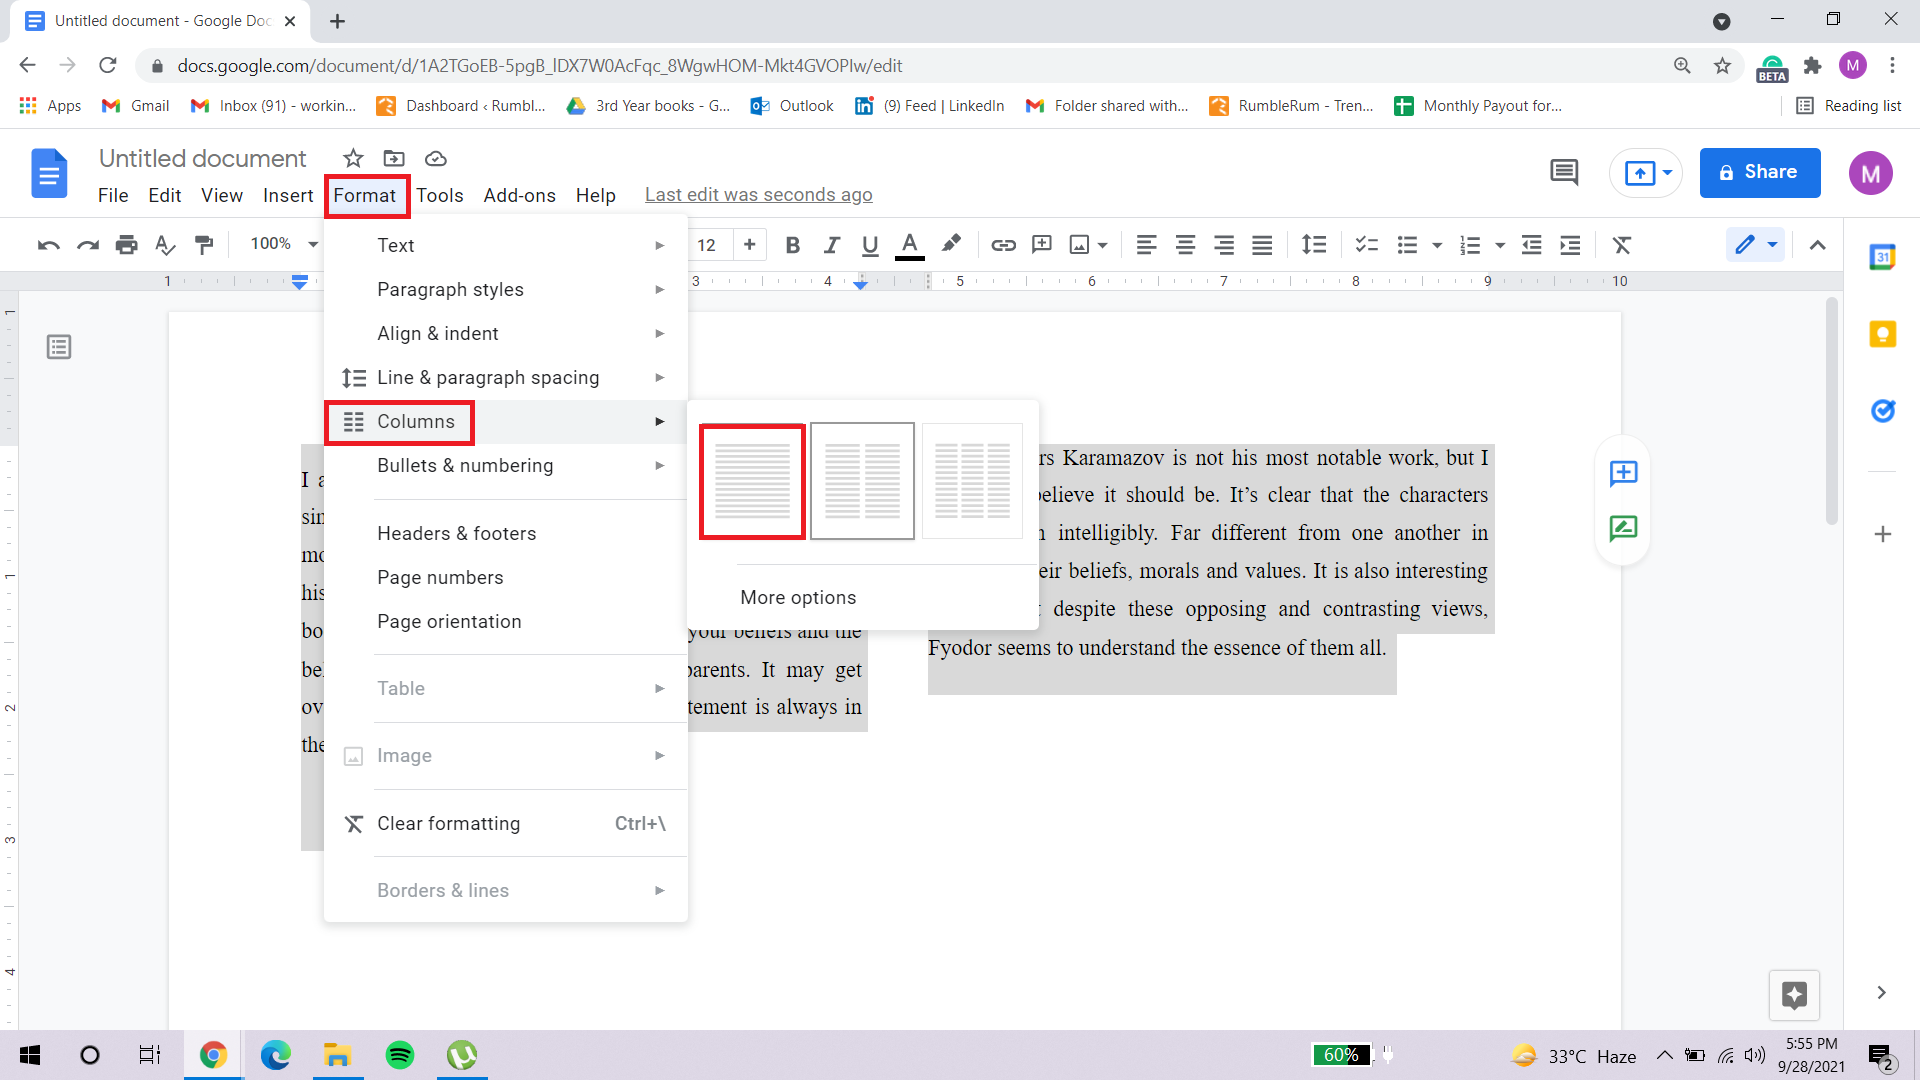
- From the menu bar, select “Format”.
- A drop-down menu will open, hover on “Columns”.
- A side menu will show you options for the types of columns available. You can choose the one that is in accordance with your preference.
- Once you select the column format, you can write inside the particular outline for your selected portion of the document.
- If need be, you can change the dimensions of your columns through the ruler shown above your document.
How to Create a Horizontal Half-Page Google Docs Document?
A horizontal half-page Google document would be the one where your page orientation is in a horizontal manner rather than the default vertical-looking portrait view. To create such a document with columns in Google Docs, follow these steps:
- Open your document in Google Docs through your Google Drive or open a blank document and start typing from scratch.
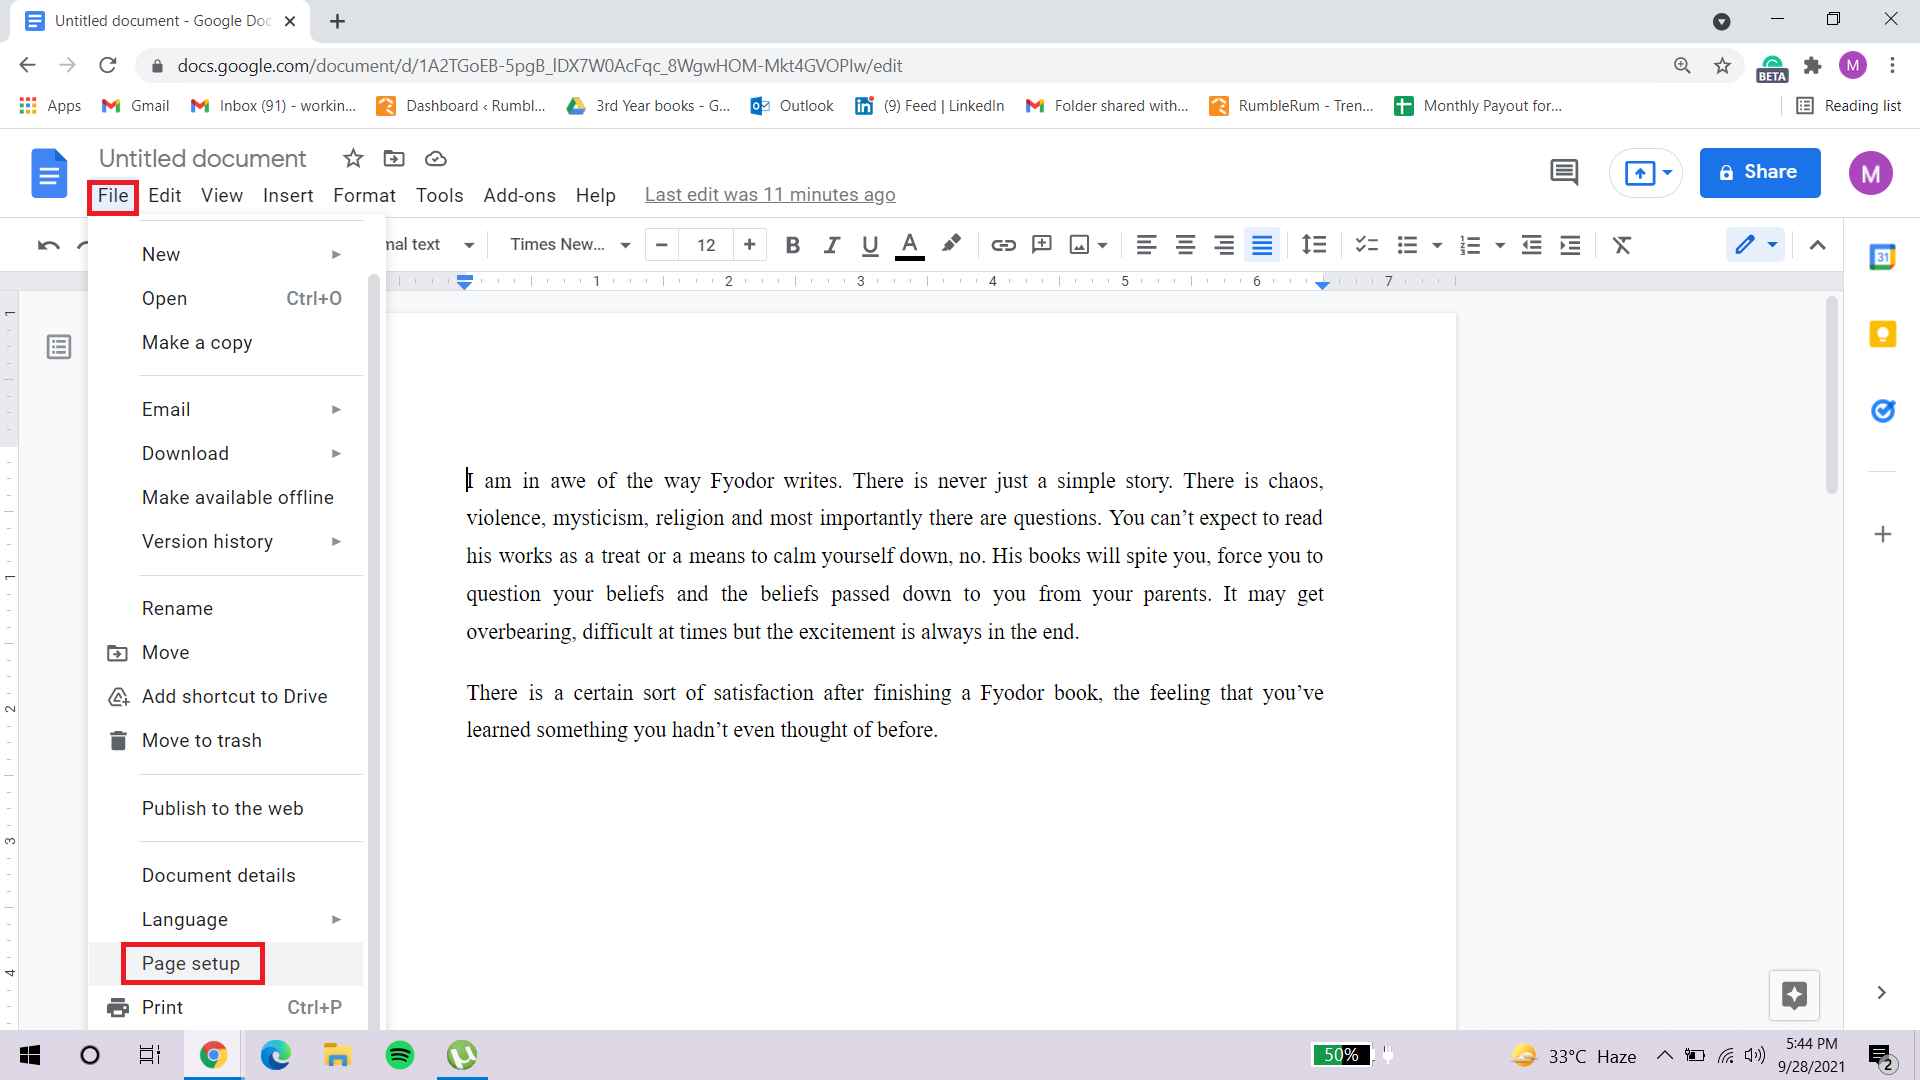
- Go to the top left corner and select the “File” option from the menu bar.
- From the drop-down menu select “Page setup”.
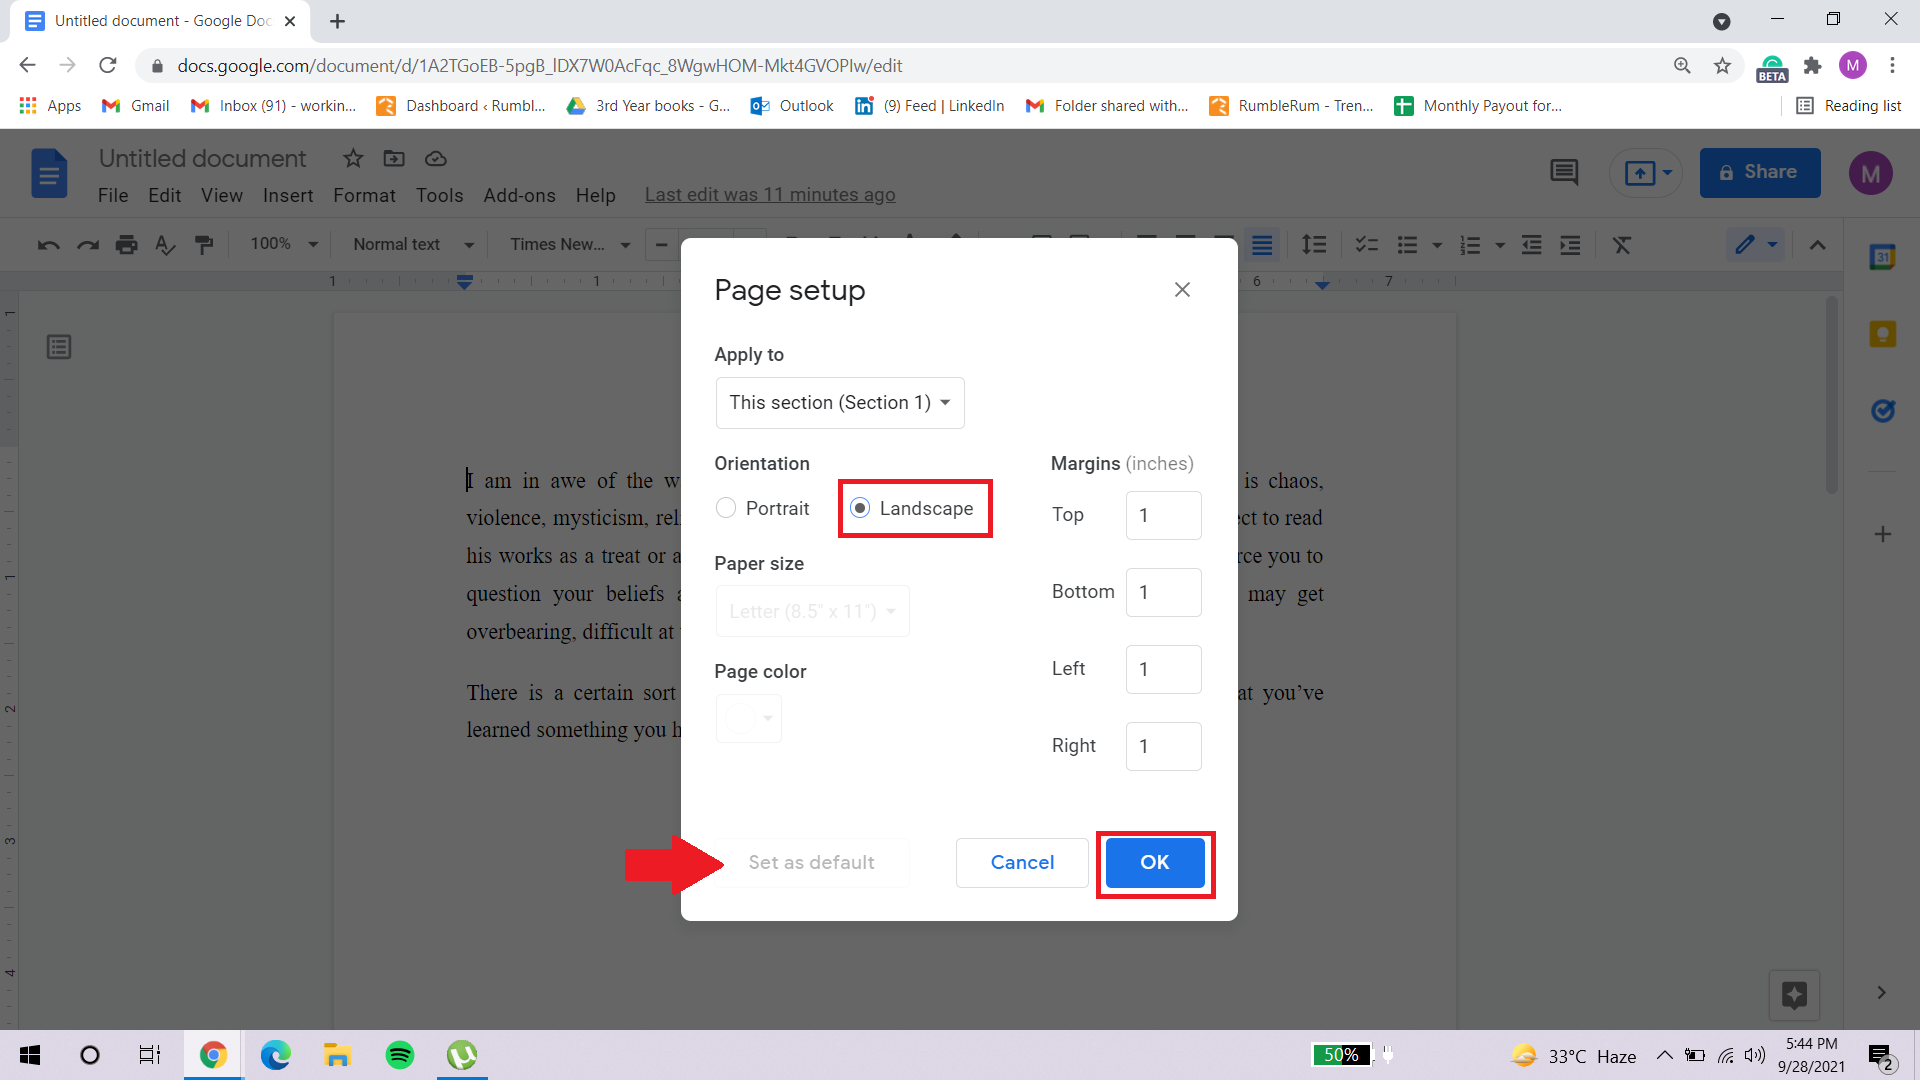
- From the pop-up “Page setup” window, select “Landscape” under the “Orientation” heading.
- Click “OK”.
- If you have to make certain copies with this same orientation in future documents (i.e. with a horizontal layout), you can keep these settings as your default.
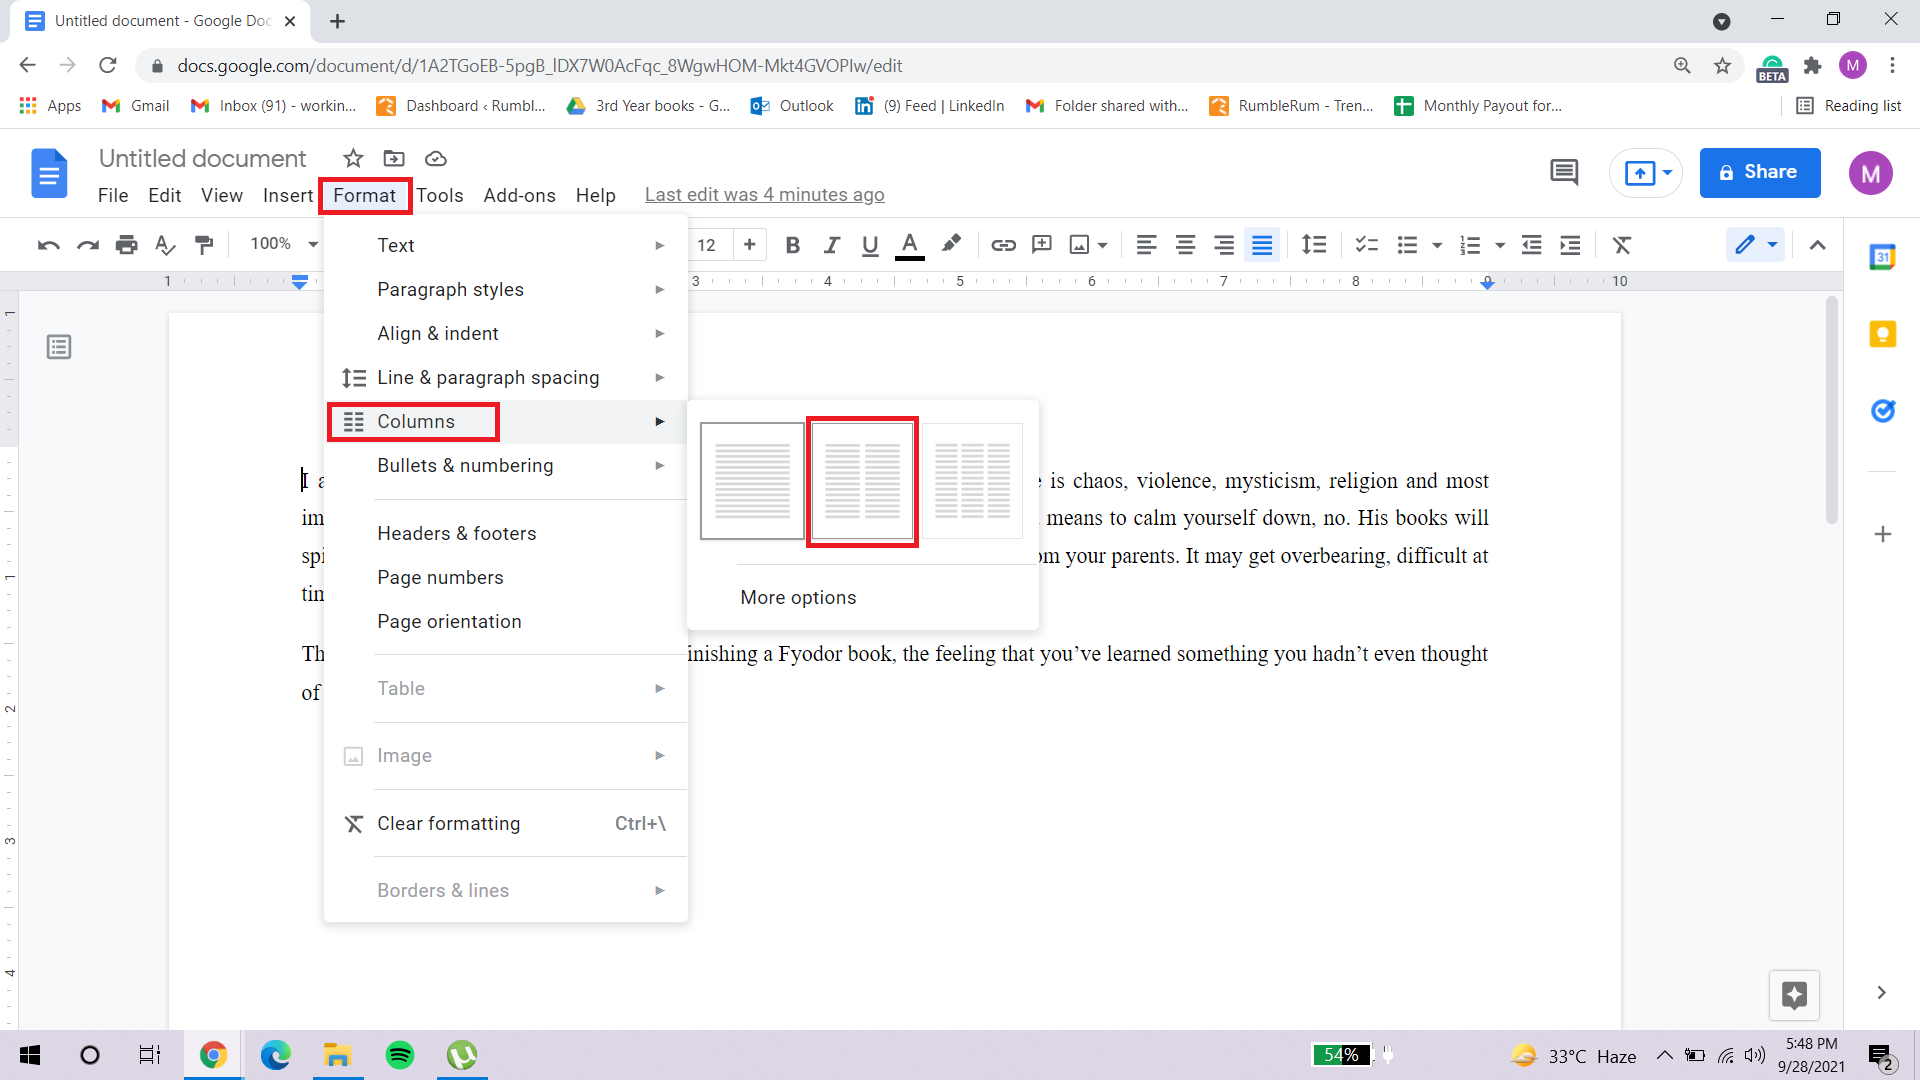
- Once done, from the menu bar, select “Format”.
- A drop-down menu will open, hover on “Columns”.
- A side menu will show you options for the types of columns available. You can choose the one that is in accordance with your preference.
- This is how your document will now look like:
- Note that the entire text has been shifted to the left of the two columns. We will discuss further ahead how to shift part of this text to the second column.
- Once you select the column format, you can write inside the particular outline for your entire document.
How to Remove Columns in Google Docs Document?
It is quite possible that once you view your text in two separate columns, it does not appeal to you the way you had thought. In such a case, you would have to remove these columns in Google Docs and switch back to the conventional single-column view.
Here is how you can remove columns in Google Docs:
- Open your document in Google Docs through your Google Drive, one with already formed columns in the document.
- Select the pre-existing paragraph that you wish to remove the columns from.
- From the menu bar, select “Format”.
- A drop-down menu will open, hover on “Columns”.
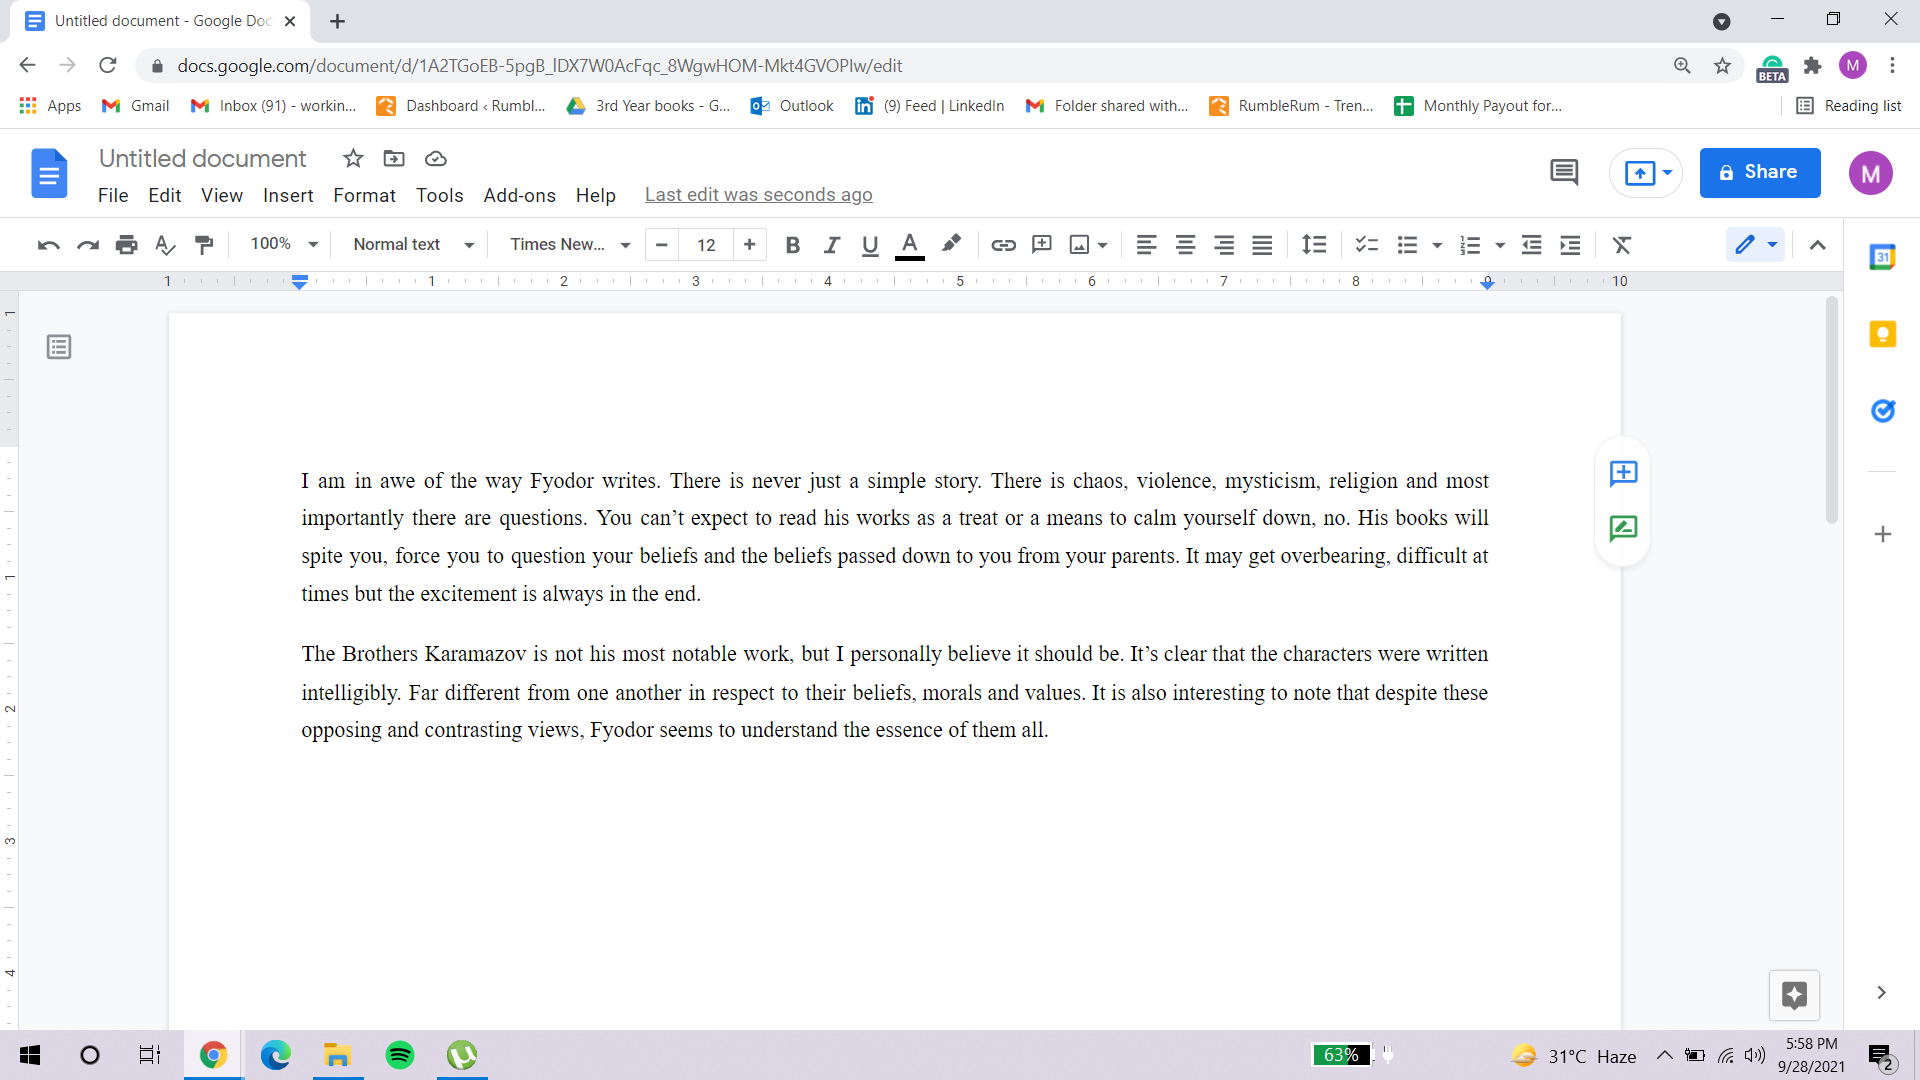
- A side menu will show you options for the types of columns available. The first one contains only one column (or no columns), you need to select that option.
- Once you select the column format, your second column will be removed and you can write in that particular outline for your entire document.
- By doing so, your columns will most probably be shifted to two separate pages. You can simply use the backspace button to bring them both to the same page.
How to Format the Columns in Google Docs?
To further customize your document whether it is to make the document reader-friendly or the goal is to simply follow a particular format, you can format the columns you have added to your document. Here are a few ways you can make the changes:
Option 1 – Indentation
The first thing to know is indentation. You will observe a blue triangle on top of the blank document. This will appear if the ruler is present in your document. If you do not see it, you can click “View” from the menu bar and go to “Show ruler” from the drop-down menu. Now the blue line to the left of this arrow shows the first indentation. You can move the arrow left or right to change the indentation. This feature proves the same function as tabbing your paragraphs. Learn more on indentation here.
Option 2 – Margin
The margin is represented by the gray portion of the ruler. If you hover over it, the cursor will turn into a margin tool that resembles two vertical lines pointing towards left and right. Once you move in either direction as the cursor turns into a margin tool, you can adjust your page margins. Learn more on margins here.
Option 3 – Dimensions
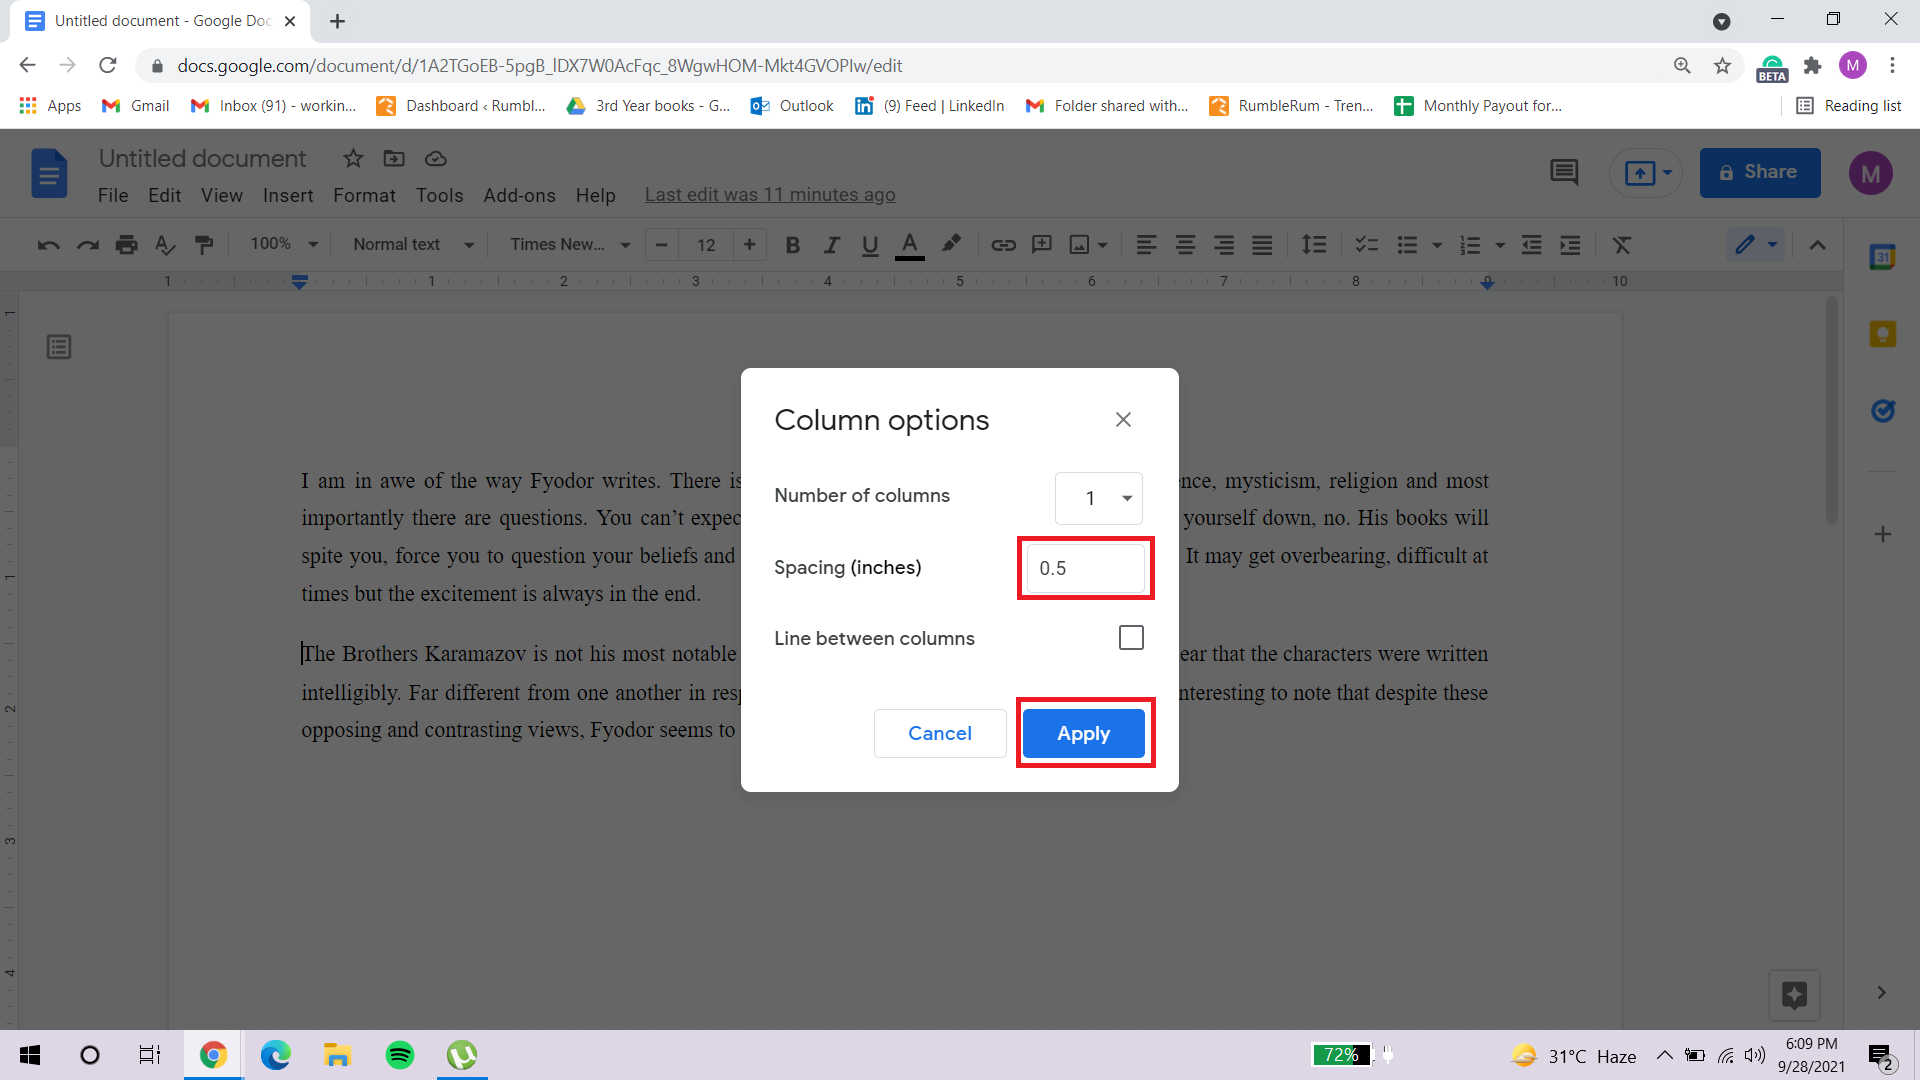
Another formatting tool for your columns could be adjusting the dimensions of them. To do this you follow these steps:
- From the menu bar, go to “Format”.
- Hover over “Columns”.
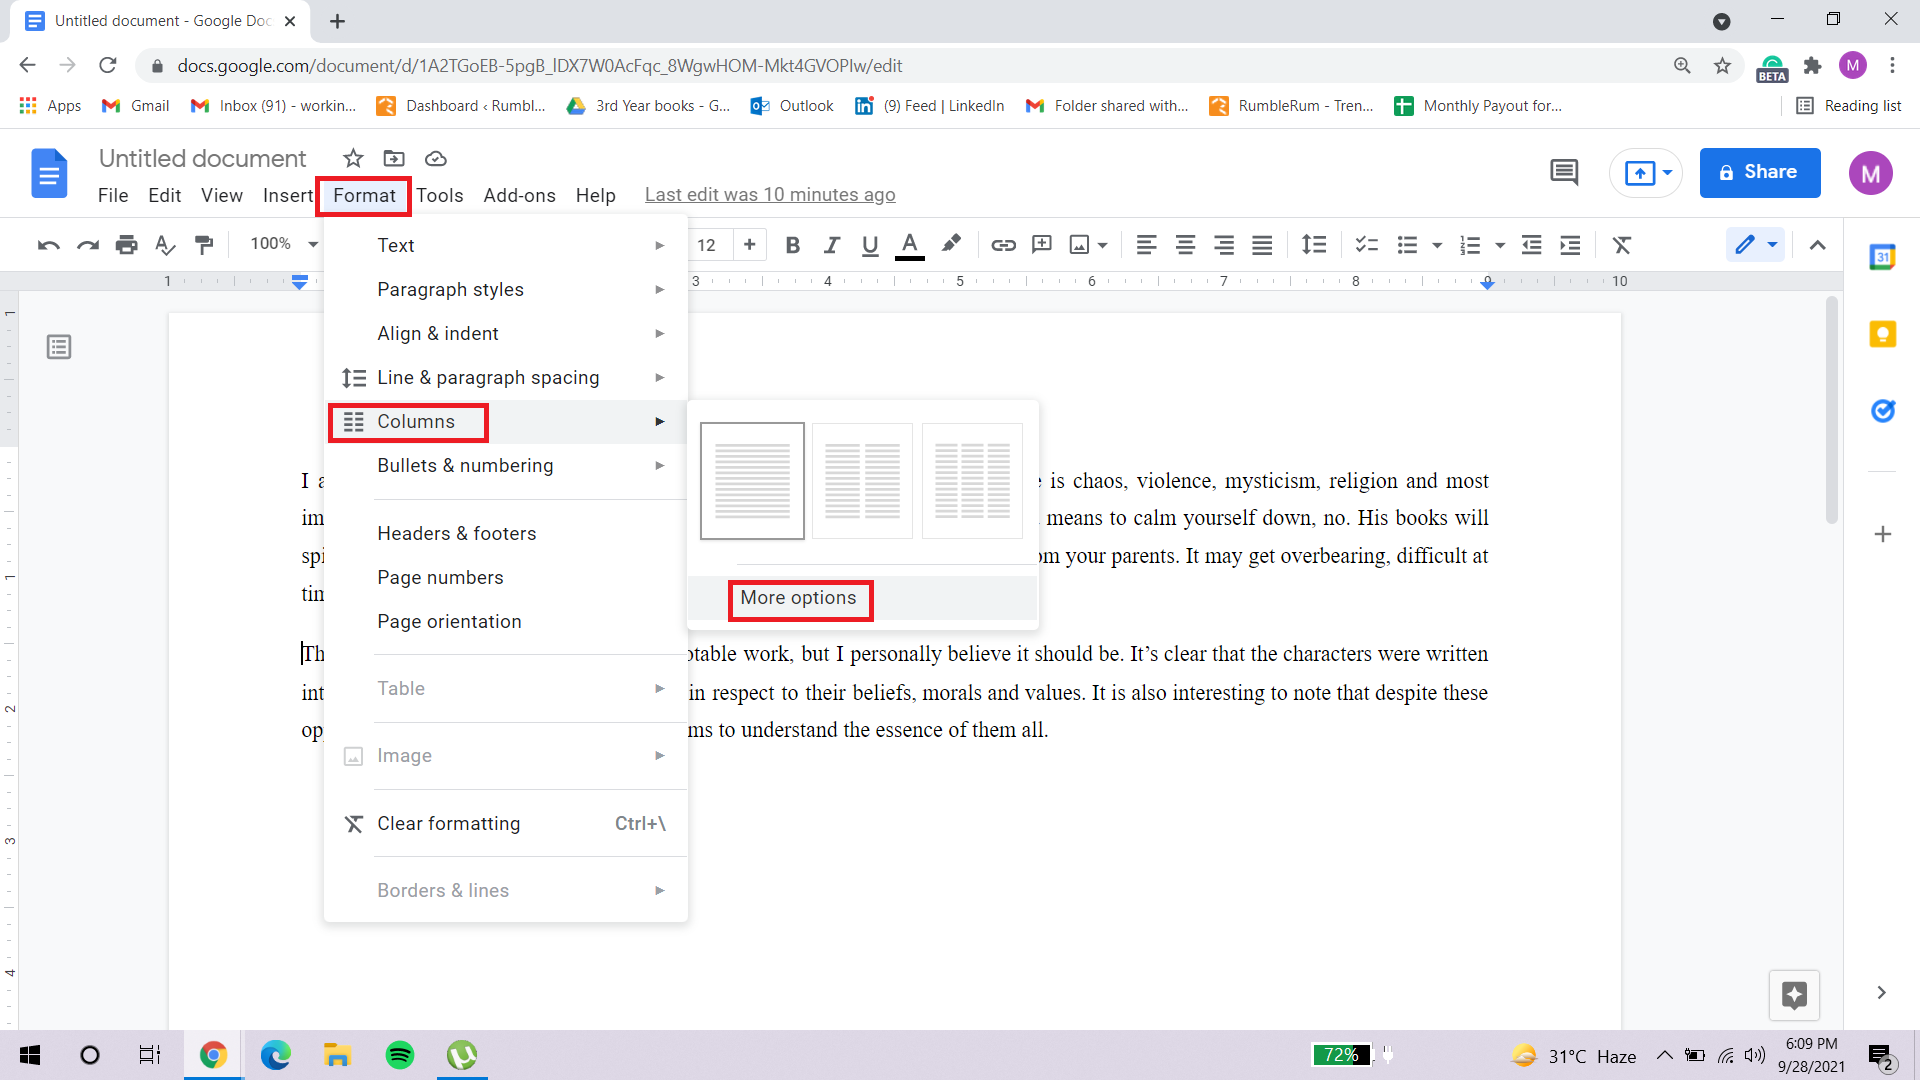
- Click on “More options”.
- You can add a specific number that will determine the size of the columns in the Google Docs document in inches.
- Click on “Apply”.
Option 4 – Column Line
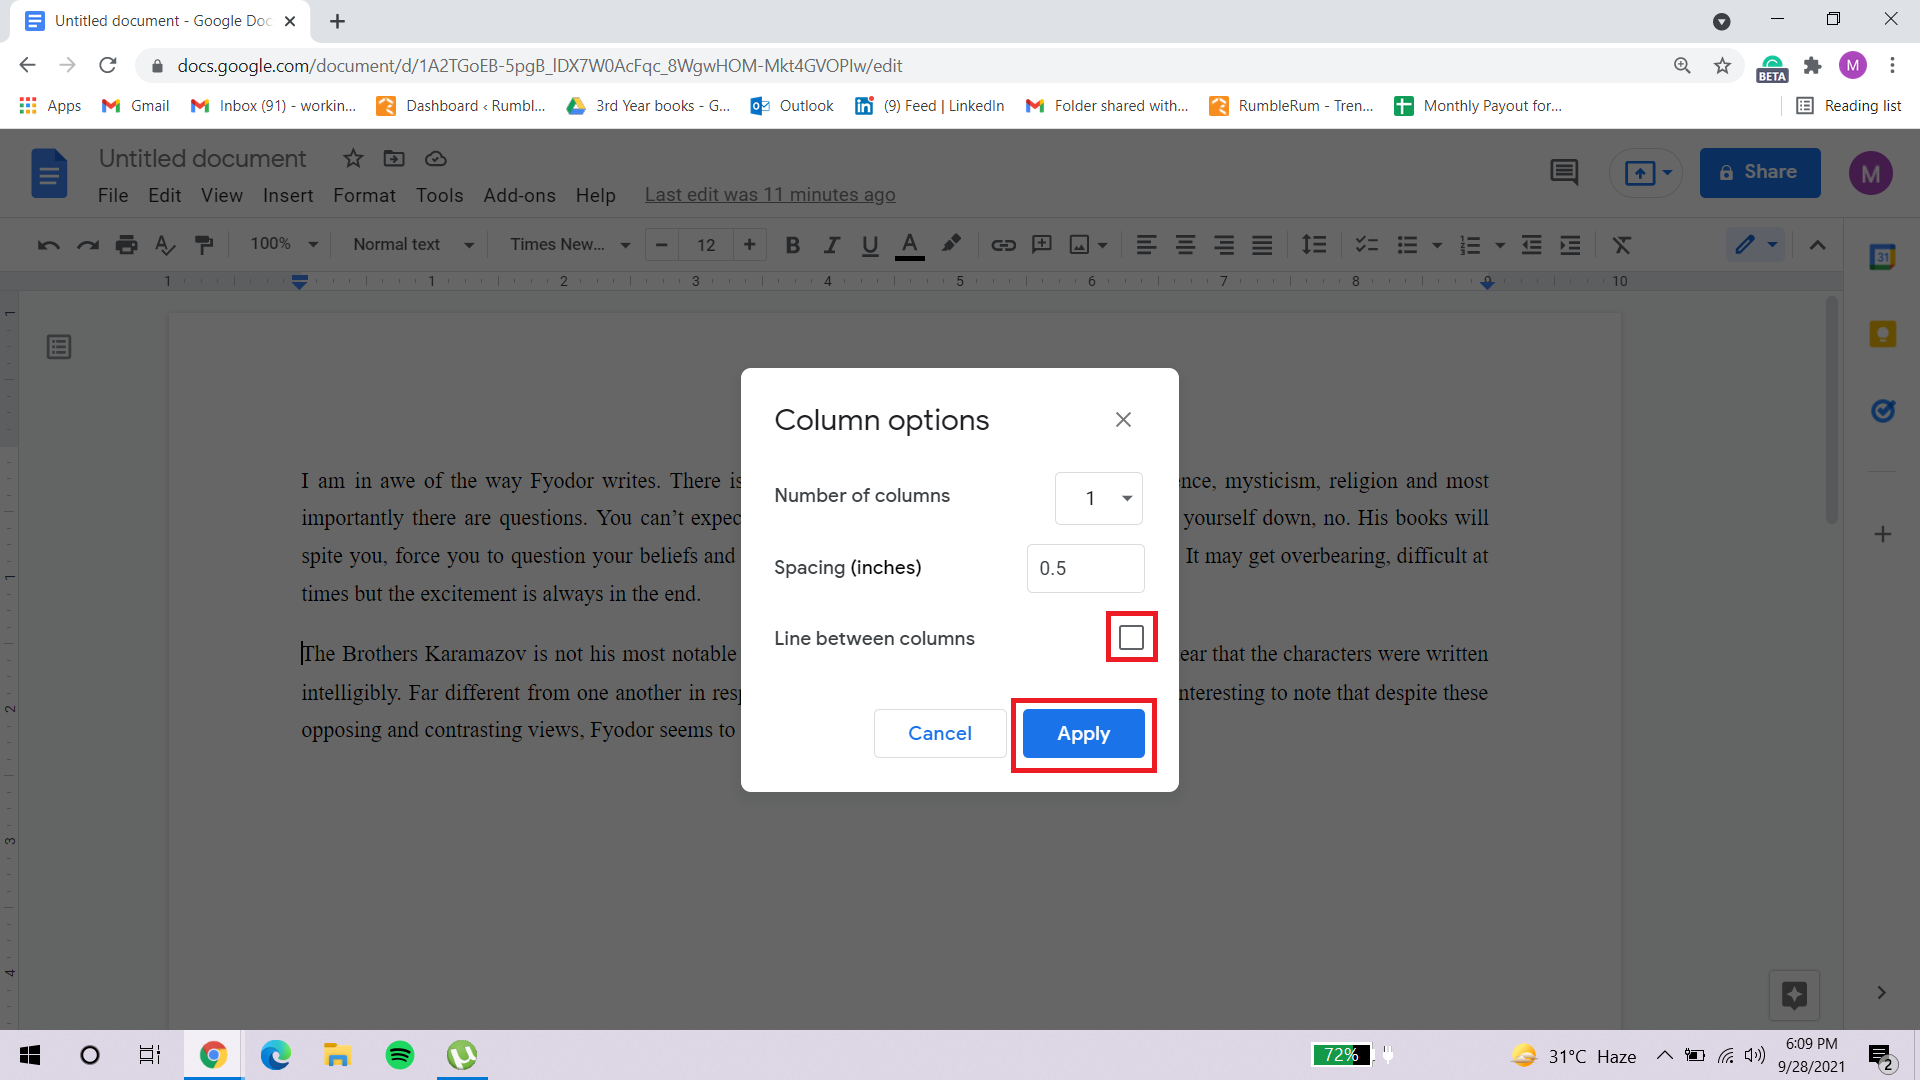
If you have to show differences or contrast between two topics in the columns, you can make the writing seem more professional by adding a line between the columns. This can be done by:
- Go to the “Format” menu, in the menu bar.
- Hover over “Columns”.
- Click on “More options”.
- Check the box next to “Line between columns” and then click “Apply”.
How to Type inside the Second Column in Google Docs?
If you have successfully added columns in Google Docs, the next thing to learn is how to write in the column format. You can continue writing in the first column and when the space runs out, the cursor will automatically shift to the next column. However, if the details of your document are of the sort that require you to work in both columns simultaneously (i.e. during comparison) you can follow this step-wise guide:
- Open your document in Google Docs through your Google Drive or open a blank document and create a new document.
- You can continue writing in the first column and add the details of the second column below it.
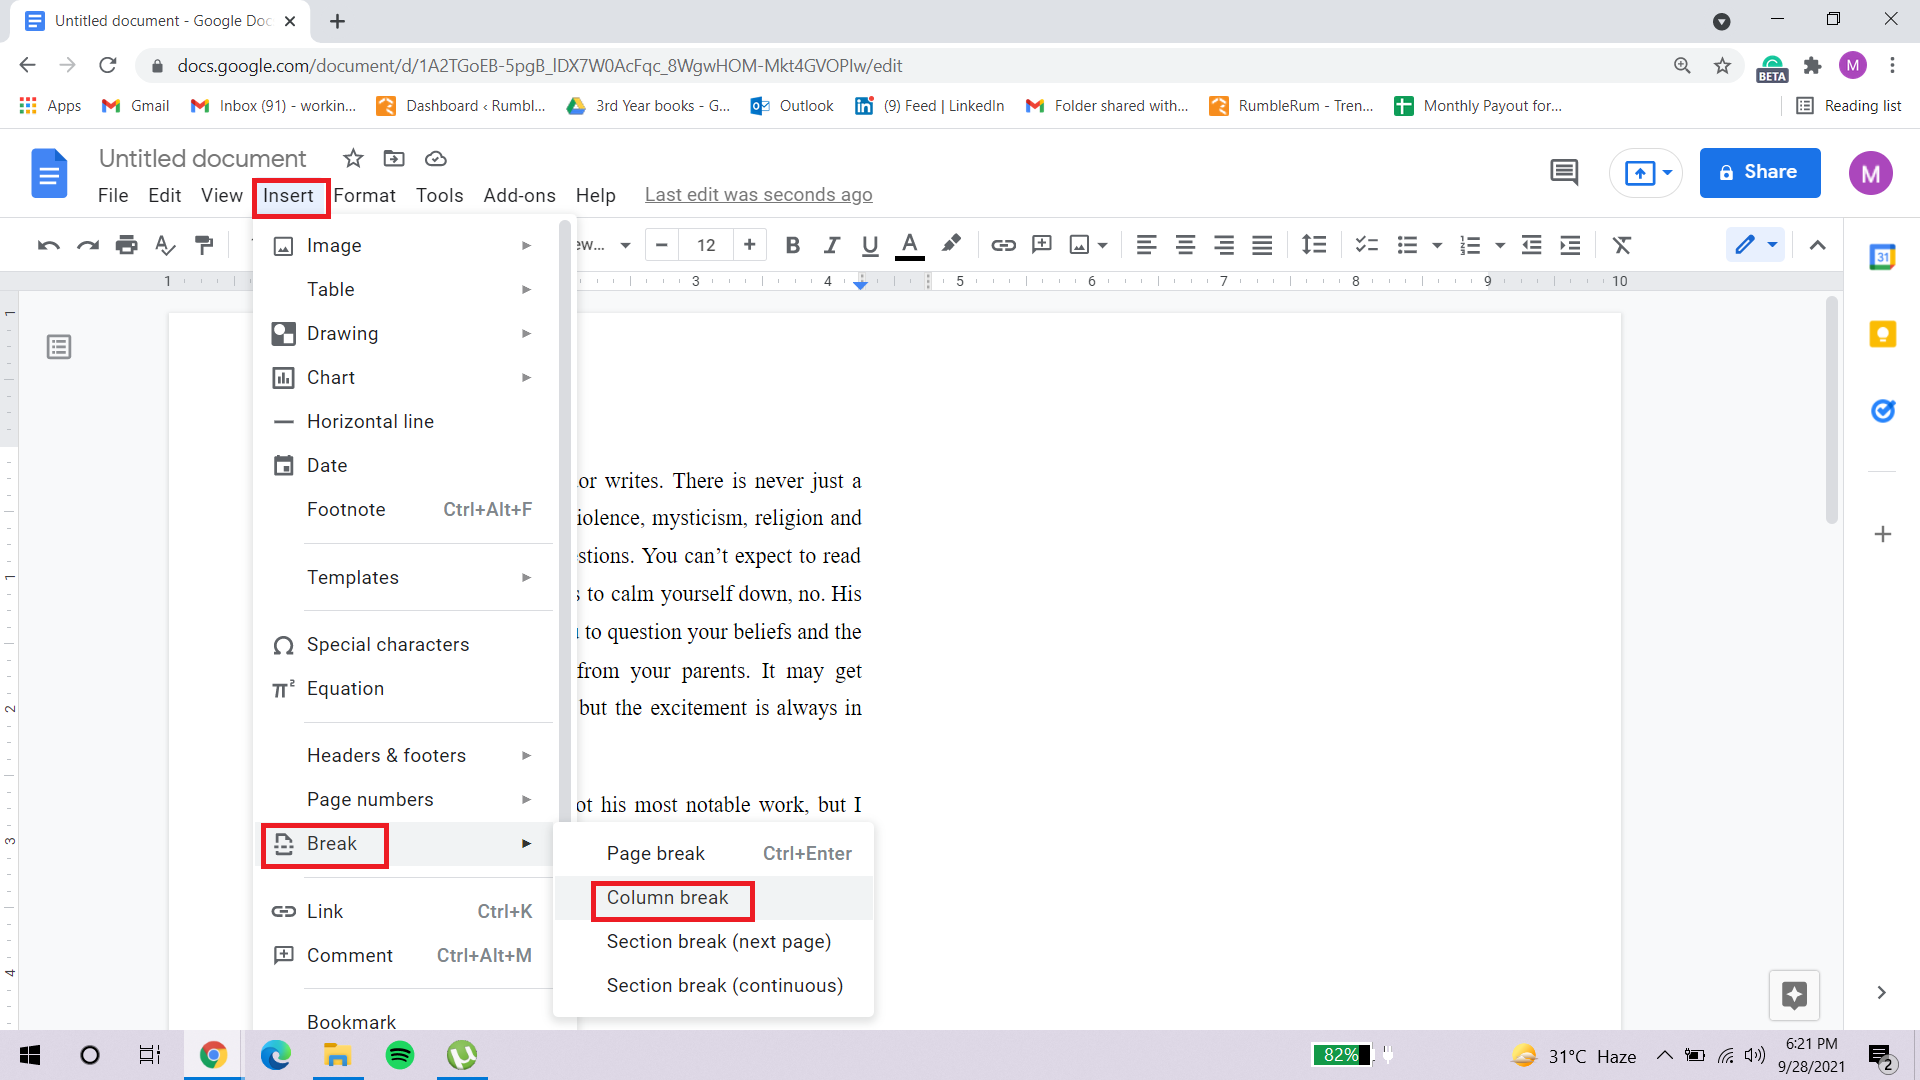
- Click just above the contents which you wish to be in the second column.
- Now go to ‘Insert’ in the menu bar and hover over “Break”.
- From the side menu, select “Column break”.
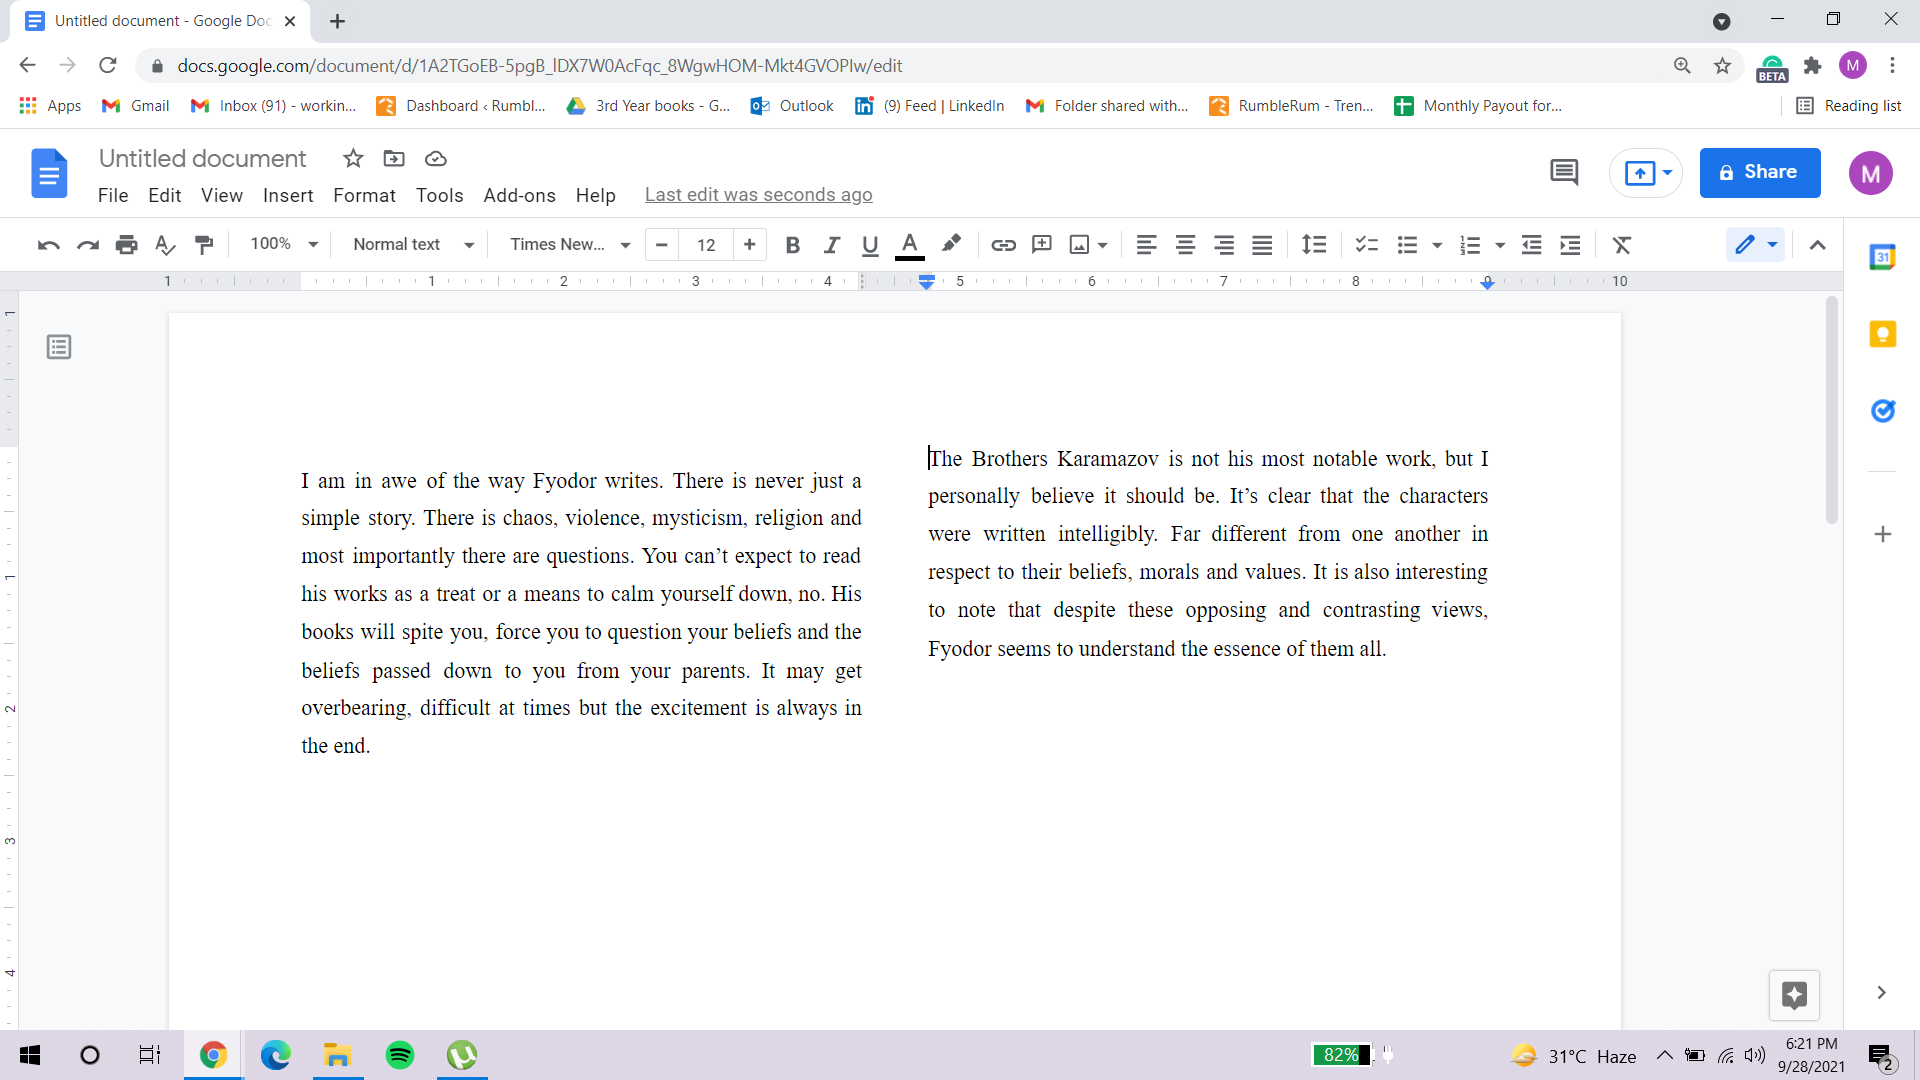
- This will add a second column in your document with the content that was present underneath the cursor.
- You can also add the column by left-clicking on your mouse and selecting ‘Column’. For mac users, press Ctrl and click the mouse.
How to Add a Vertical Line Between the Columns in Google Docs?
This has already been mentioned in the “Formatting columns” portion, but since adding lines to columns is a very important component to adding columns in Google Docs, let’s discuss it under a separate heading as well. To show the two columns prominently, you can add a line between them. This can be done by:
- Go to the “Format” option from the menu bar.
- Select “Columns” from the drop-down menu.
- Click on “More options” from the side menu.
- You can check the box that says “Line between columns”.
- Click on “OK” and voila!
How to Add Columns in Google Docs on your Android Device?
Google Docs on your Android device, unfortunately, does not offer the option of adding columns to your document. However, when push comes to shove you can always make do with what you have.
- Open your Google Docs document on your android.
- Click on the pencil icon to shift your document to editing mode.
- Tap on the “+” symbol or the pencil icon which shows the “Formatting” tools.
- From the drop-down menu, go to “Tables”.
- Reduce the number of columns to two and rows to one
- Tap on “Insert Table” and you can use this hack to act as a column for your Google document.
The only drawback to using tables on your device is the lack of options to remove the boundaries. The option is available on the browser but if you are going to use the browser, you can go directly for the columns options directly and skip the table trick completely.
How to Add Columns in Google Docs on your iPhone and iPad?
Users of iPhone and iPads can avail the same tools in Google Docs as the users of android devices. The steps to add a column to your document using your iPhone or iPad are pretty much the same as Android. Hence follow the same steps mentioned above and start getting creative!
Frequently Asked Questions (FAQs)
Q. How do you split cells in Google Docs?
The only way you can split cells in Google Docs is if they were previously merged. Here is how you can merge them:
- Select the cells you wish to merge by highlighting them.
- Click on “Format” from the menu bar.
- From the drop-down, click on “Tables”.
- Click on “Merge cells” from the side menu.
- Now, if you wish to split these merged cells, you can left-click on the particular cell and select the “Unmerge cells” option.
Another way you can merge cells is by selecting the cells you wish to merge, left-clicking on the mouse, and click on “Merge cells” from the options. For macs, you can simply press the “Ctrl” and “+” keys.
Q. How do you write two paragraphs side by side in Google Docs?
You can write two paragraphs side by side in Google Docs by simply adding columns to your document. You can click over the second paragraph that you wish to appear parallel to the first paragraph, then go to the Format menu and add a column break.
