How to Plan Your Next Trip Using Google Maps Trip Planner?
 Image Source: Google
Planning a trip is a piece of cake these days with the availability of numerous applications and websites that take you through the process and be your ultimate travel guide. One of the best available tools that helps you keep organized while planning your travels is Google Maps Trip Planner.
Contents
Why you should Start Planning all your Future Trips on Google Maps Trip Planner
Google Maps offers everything it takes a travel fanatic to ensure that they have the time of their lives. It allows you to figure out where you can realistically travel during the duration of your trip. The Google Maps application gives multiple options to its users to ensure a convenient trip. These options include the selection of multiple stops in a single itinerary, and also the freedom for users to add numerous recommendations from their friends and family into the map.
It also helps you plan your entire day in a very realistic approach so you can understand how much time you will potentially spend on traveling and how much time you can spend enjoying your planned activities.
Imagine you reach your destination and you are starving, now once again, Google Maps Trip Planner comes in handy and explores the area around you automatically recommending and highlighting the places your friends have visited and recommended in the past. Pretty convenient, isn’t it?
Some other advantages to using the Google Maps Trip Planner are mentioned over here:
1. Visualizing your Trip
Through the use of the Google Maps Trip Planner, you can essentially visualize your entire trip in real-time. Doing so will help you determine if your plan is realistically feasible or not. This option is a dream come true for those people who enjoy and find satisfaction in extensive planning. Imagine having your entire planner laid out in front of you with color-coded sticky notes. Not just that, imagine having access to it at all times with just a few clicks on your phone! Pretty neat, if I may say so myself.
The customizable options are many! You can unleash your inner creativity all the while catering to your organizational requirements. We will discuss the process for customizing maps subsequently.
2. Determining how to Spend Time Efficiently
When on a trip, the last thing a person would want is to book a hotel far away from the spots that they want to visit. Similarly, traveling to a spot that happens to be miles away from the rest of the locations. How Google Maps Trip Planner helps you in this regard is that it shows you the distance between different locations in addition to the likely commute time. This allows users to make better decisions regarding their trips so that they can utilize their time as efficiently as possible.
You can also choose to stay at two different locations and visit the popular areas near those particular regions. In the end, it all comes down to efficient and effective planning.
3. Knowing What to Expect
Let’s be honest, we all love surprises, however, when these surprises turn out to not be so pleasant, the disappointment is greater than normal. The Google Maps Trip Planner gives you a good idea of what you can expect out of your trip and whether those expectations are worth the effort or not.
It’s always better to know what you’re getting yourself into to avoid any regrets.
4. Receiving all Contact Information
Google Maps is notable for its ability to gather contact information of destinations all around the world. This means making reservations and bookings becomes a piece of cake. With one platform providing all necessary information, users don’t have to spend extra time on other websites.
5. Importing Data between Devices
Just because you’ve created a trip map through Google Maps on your desktop does not mean you can not access it on your other more portable devices such as mobiles and tablets. You can automatically import your trip data from one device to another in just a single step. This process will be discussed ahead.
With that being said, it won’t be a surprise to you knowing you can also share the map with your travel buddies. This way, the entire group is updated with the trip and they can make suggestions accordingly. Long gone are the days of mismanagement.
How to Easily Use the Google Maps Trip Planner
For a detailed overview of how to use the Google Maps Trip Planner to plan your next trip, follow the step-by-step procedure briefed below:
1. Make a new Google Map
In order to start making a new Google Map, click the link here. The following link will prompt you to the home page of Google Maps which you most probably are going to be already familiar with. If you are not already logged into your Google account, make sure you log in and then proceed with the steps ahead:
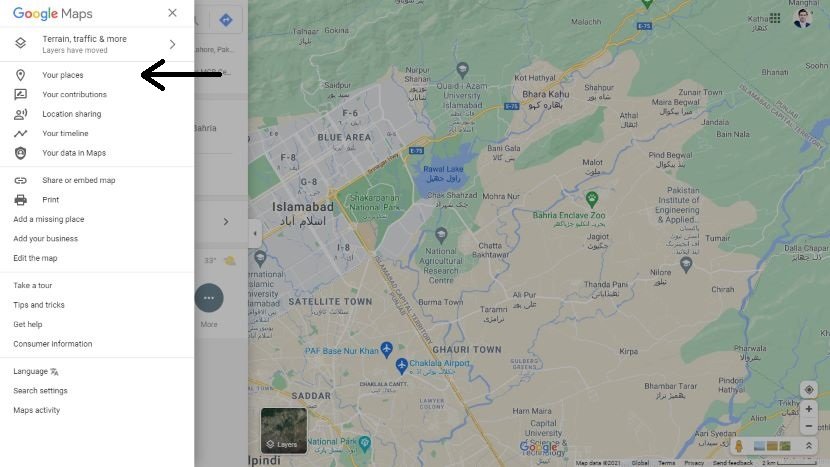
- Once you are successfully logged in, click on the three horizontal bars sign on the top left corner of the page.
- This will open up a list of options.
- Select Your places from the menu.
- Doing this will prompt you to another menu.
- From the new screen, you will have to click on Maps in the top right corner.
- If this is an option that you have used before then you will see the maps that you have previously created but if you haven’t, you will have to click on Create Map.
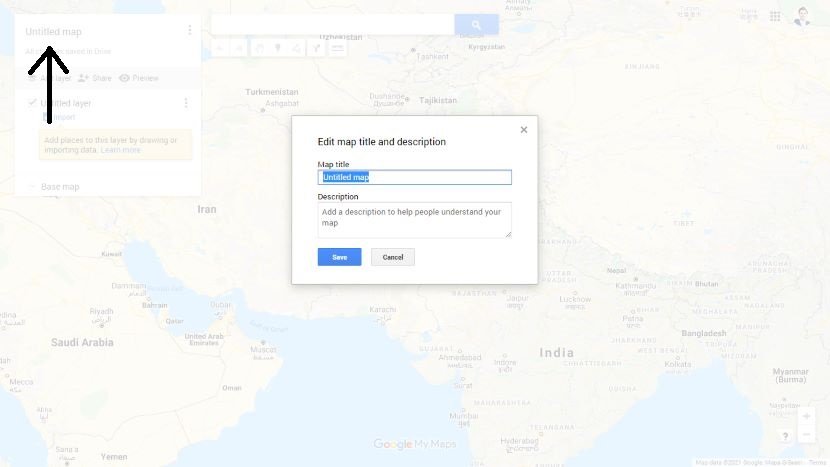
- You will be directed to an untitled map that you will have to name and add a description to.
- In order to name and describe the map, click on Untitled Map and a box will open that will allow you to add this information.
- Being as specific as possible is very important so you can stay organized along the process.
2. Categorize the Map
With the first step done, the second important step in using the Google Maps Trip Planner is categorizing the map. It usually means creating a list of all the activities and things that you will spend your time on during your trip. You can add the things according to your preferences but an example of how it generally looks like is given below:
- Eating out in restaurants or bars
- Shopping
- Having snacks in cafes
- Staying in hotels
- Enjoying other activities
- Visiting important and notable places in the city or the country
Once you’ve decided on how to categorize your activities, you can move on to the next step.
a. What are Google Maps Layers?
Now, before we move on to the next step of the process, it is important for us to understand what “layers” are. In Google Maps language, layers represent different types of information. This information could entail any of the categories mentioned above. In this way, you can create a layer for restaurants, a second layer for shops, a third for hotels, and so on.
b. How to Create Layers in Google Maps?
After completely selecting things for your category list, you will now create a layer for each one of them. To do this, follow these steps:
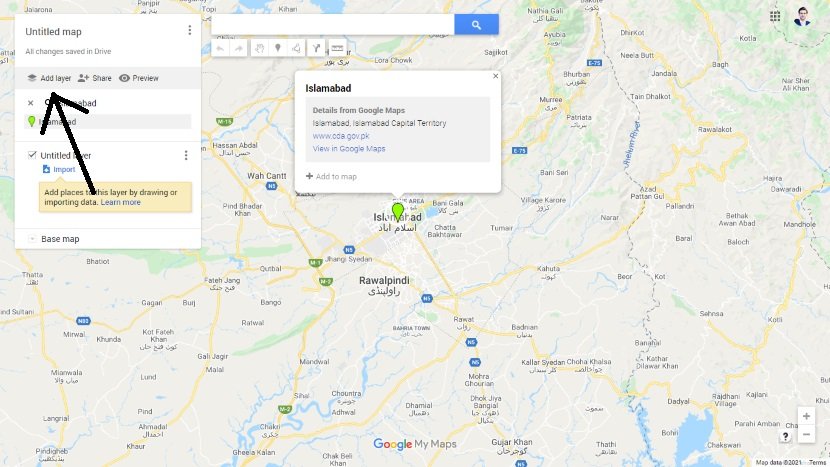
- Start by clicking on the Add Layer button on the left-hand side of your screen.
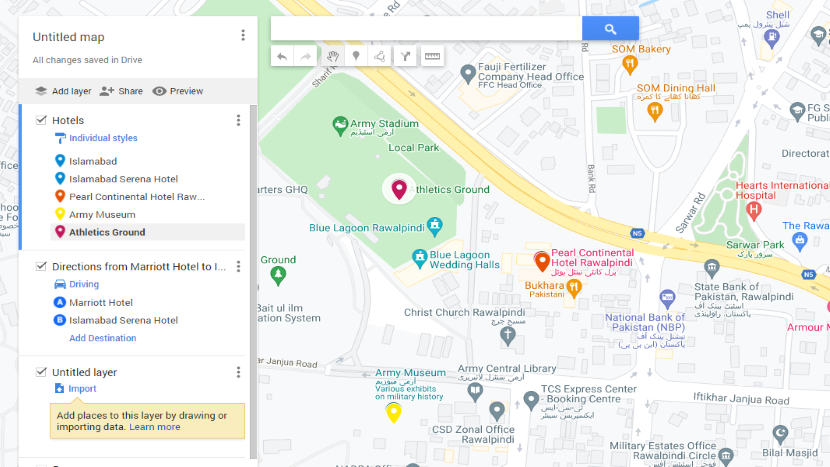
- You have to be sure to name each individual layer by clicking on the Untitled Layer text box. The layer that contains the list of all the hotels to be stayed in will be named “Hotels” or something similar.
- This has been shown in the screenshot below to let you have an idea.
- You can either search up individual hotel names from the search box or use the map to pinpoint exact locations.
- Once you have done setting up one layer, you can add in another for some other purpose such as “Places to Visit” or “Restaurants to Visit”.
- If you’ve accidentally created an extra layer, you can delete it as well. Simply click on the three-dot option next to the layer title and choose the Delete option.
3. Add Ideas to Google Maps
Once you have established all necessary layers, you need to add items to each individual list. It has already been mentioned in the previous section that you can do so by using the Google Maps Trip Planner search box or using the map directly. Here, let’s discuss this process in detail.
Google Maps Trip Planner provides you with an option to add a variety of your own ideas that you have had on your bucket list for your dream destination. You can sort those ideas using the application and keep them organized so you can later prioritize them based on the available timeframe.
To add these custom ideas such as the next hotel you are staying in, you need to follow these steps:
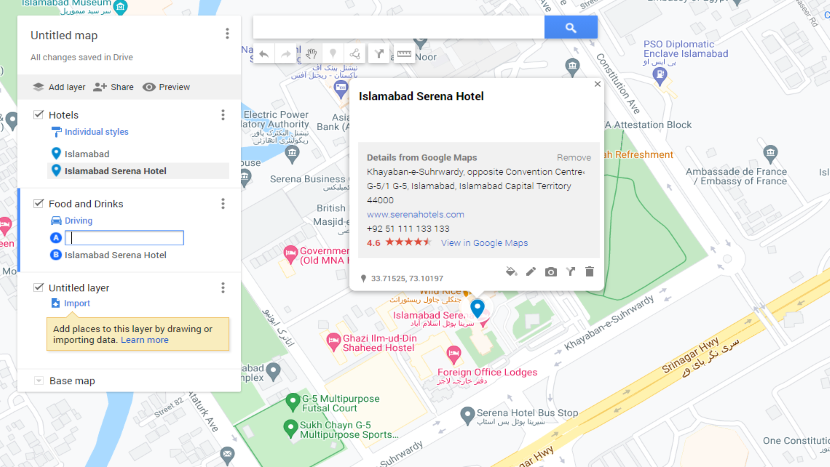
- Check the box that says “Hotels” on your layers.
- Next, type in the name of the hotel that you’d like to stay at once you reach that particular destination. Enter the name of the hotel in the Google Maps search box.
- Once you enter the name of the hotel it will give search results from where you can select an option by clicking Add to Map
- By doing so, you will notice that a marker has been added to that place. You will also notice that the name of the place which in this case is a hotel, is added underneath the layer description on the left side of the screen (here, we have added Islamabad Serena Hotel).
- This makes it easier to organize everything that you think you will be needing throughout your trip.
There are however a few mistakes a person can make while adding the destination to the layers. two of those common mistakes/errors are;
- You can accidentally add a location to the wrong layer which is nothing to worry about as you can correct it by simply dragging the location and putting it back to the desired layer
- It is quite possible that the place you are looking for doesn’t auto repopulate on Google Maps Trip Planner. The reason is most probably that Google hasn’t made a location of that place yet. You can simply add the address of that location manually (using the map directly, in this case) and give it a custom name for future reference.
4. Customize Your Map
Customizing your Google Maps Trip Planner can be very important because visually organized data is easier to sort out and classify. The Google Maps Trip Planner provides users with different levels and kinds of customizations to add that extra oomph to the entire planning process.
a. Color-Coding
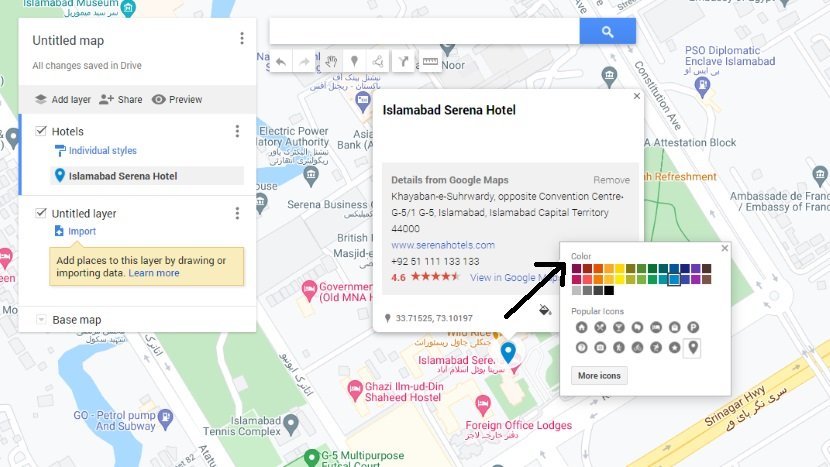
You can make things more visually organized by color-coding your markers by their category.
In order to color code, your markers, follow these steps:
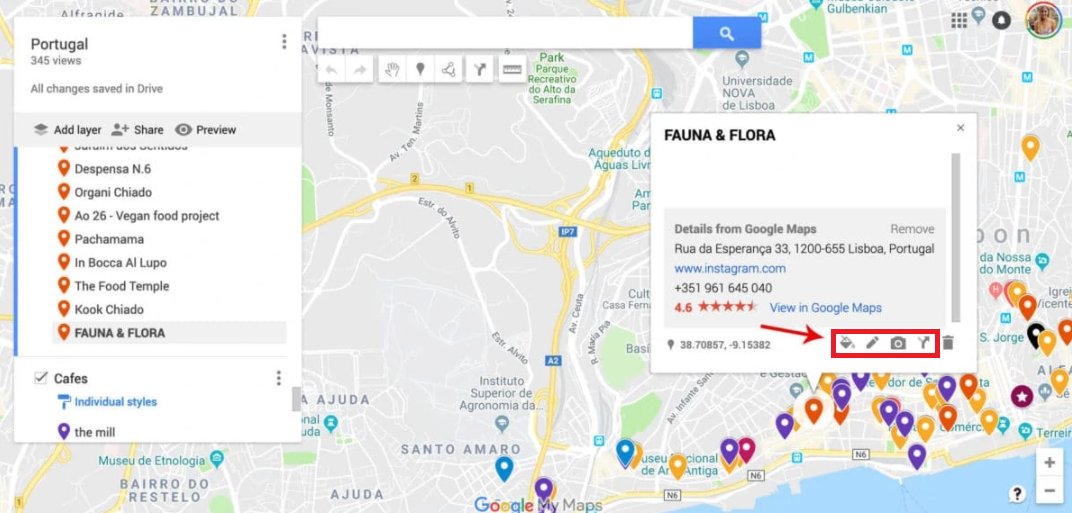
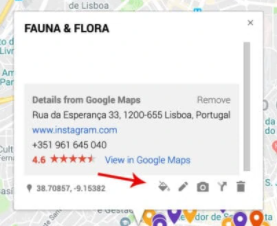
- Click on the Paint Bucket at the bottom of your marker’s pop-up window.
- You can further add ideas about that location by clicking on the Pencil icon and adding information that you think will come in handy or help you enhance your experience.
- You can also remove an idea from the list by just clicking the Trash Can icon on the same panel.
You can use the color-coding technique smartly by following the instructions given below:
i. You can Color-Code things by their Priority
You can prioritize the places on the basis of importance by coding them with specific colors. For example, the places that you must visit can be coded in the color red and places that want to visit if you have time can be coded green. This way you can make sure that you have stayed true to your list and done everything according to your plan, priority, and availability of time.
ii. You can Color-Code to further Categorize your Ideas
You can use the color-coding option to sub-categorize your ideas. For example, instead of having just one color i.e., blue for all your “Activities”, you can break It down into various colors for subcategories in the same section. You can code parks as red or museums as yellow and so on.
iii. You can Color-Code Restaurants Based on Prices
The color-coding feature makes it easier for you to categorize the restaurants in your list on the basis of their prices. This helps you be more efficient while deciding where you are having your next meal and helps you keep a check on your wallet as well.
b. Adding Icons, Notes, and Other Media
Using the different options available on the bottom of the location pop-up window, you can choose to add icons, photos, videos and enter notes that you believe will come in handy during the actual trip. These could include images and videos of the locations, icons representing the category of said location, and notes of all the things to be done when at the spot.
5. Get Directions and Distances
Perhaps the most important aspect of not just the Google Maps Trip Planner service, but the entire application itself: directions and distances. Accessing directions to and from different places when using a custom map is pretty straightforward. Simply follow these steps:
- Click on the required destination.
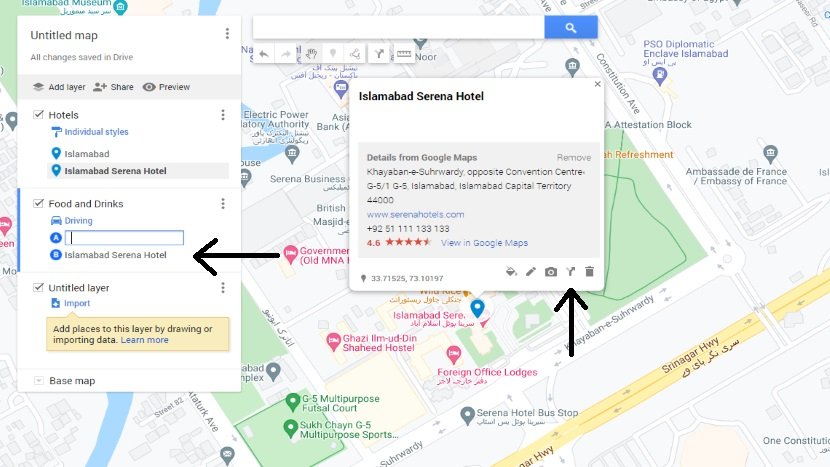
- From the pop-up window, click on the double-arrowed icon. This icon will be immediately next to the trash icon.
You can also add directions to multiple destinations one by one. To do this you have to:
- Click on the Add Directions icon indicated by the same icon immediately below the location search box.
- Doing so will automatically create a new layer. In this layer, you can add up to ten different locations.
- Make sure your destination order is suitable so that there’s no back and forth traveling.
6. Decide which Activities to Group Together
The next step while setting up your Google Maps Trip Planner is to decide the activities that you want to group together. Google Maps makes it easier for you to decide this by presenting a complete zoomed-out display, thereby, letting you have a better picture of what you have marked so far.
You can now see clearly which restaurants you are visiting first and which can be left for later, which parks are a must-visit site and which can wait. You can also group the activities together to help you achieve your milestones even more efficiently.
Once you are able to see the entire thing in full view, you can check whether your itinerary is realistic or not. Grouping activities together makes it easier to get most things done but if your activities are far apart from one another with respect to location then it means that you might have to switch to activities that can be done closer together.
7. Keep Up your Daily Itinerary
It always makes it more convenient to have a fully planned day-to-day itinerary that can have all the necessary information such as the hotels’ confirmation numbers and important addresses. Always make sure you have a Google Doc updated with all the necessary information to prevent you from losing time.
If, however, you are deciding on driving when you reach your destination, you can quite easily pull up directions to your first stop by easily clicking the arrow icon that is on the bottom of the pop-up panel.
Another option is creating two custom maps instead of one. One can be a more generalized itinerary that is purely for inspirational purposes, whereas the second map can be more specific pertaining to your day-to-day activities. In the end, this decision solely depends on what works best for you.
8. Download Google Maps on your Cell Phone and Log In
It is always a good option to have everything important within the reach of your hand so the next step is to download Google Maps on your phone and log in so that you can have the Google Maps Trip Planner that you created accessible on your phone. Once successfully logged in, go to Your Places and click the last tab on the right that says Maps, and there you go! Your Google Maps Trip Planner has been successfully accessed on your mobile device.
9. Share the Map with your Travel Buddies
Google Maps has a share option that lets you share it with your friends or travel buddies. It makes it easier to keep everyone on the same page if you are traveling in a group. You can also share it with your friends who are heading to the same destination (and want the same experiences as you) after you have successfully and joyfully completed your tour.
In order to share the Google Maps Trip Planner from the desktop version, you can just simply click the Share button that’s underneath the title of your map.
You can also share the Trip Planner Map from your phone. Simply follow these steps:
- Open the Google Maps application and click the three bars icon at the top which will open the menu. On some phones, you will have to click on the letter icon.
- Click Your Places and then follow it by clicking Maps.
- Select the map that you want to share and then select View Map Legend and click Share. You are given several options you can share the map through i.e., Text, Airdrop, Facebook, Twitter, etc.
- You can always add additional notes on your reviews about the places you visited so it will come in handy in the future or for the people you share your google maps with.
10. Access your Google Maps Trip Planner Offline
Imagine you’re going to a remote area with little to no possibility of mobile data. What do you do now? You go prepared, of course! And we are here to help you with that preparation.
The thing about offline Google Maps Trip Planner is that it does not exist in the conventional “offline” sense. There is, however, a way to go about this situation. For doing this, you need to use a different application altogether which is Google Earth.
Here are the steps you need to follow:
- Begin by downloading the Google Earth application on your mobile.
- Open up your Google Maps Trip Planner on your desktop.
- Click on the three-dot button next to the title of your map.
- Click on Export to KML/KMZ.
- From the pop-up window, keep the boxes unchecked and Download.
- Once downloaded, you can email this file to yourself.
- Open the email from your mobile device.
- When your mobile device asks you how to open the downloaded file, select Google Earth.
- And all done! You’re sure to have the trip of your life now!
