How to Enable Track Changes in your Google Docs. Find out here!
 Image Source: Google
Google offers its users a number of different services. These include Google Sheets, Google Slides, Google Drive, and Google Docs. All these applications offer many functions to the Google user.
It is safe to say that Google Docs is the most widely used and the most famous amongst users. There are various features and tools offered by Google Docs, much more than what a common user is aware of. One such tool is the track changes in Google Docs (also commonly known as the suggesting tool).
In order to fully optimize your writing game and elevate your Google Docs experience, you must be aware of the track changes in Google Docs. Here are a few questions regarding track changes in Google Docs discussed in detail for beginners.
Contents
What are Track Changes in Google Docs?
The feature of track changes was initially introduced by Microsoft Word and was later incorporated by Google Docs as well. The tool ended up displaying a number of bugs and errors because of which it was removed from both applications. The feature was reviewed and improved and in the year 2014, it was reintroduced, however, with a different name. When the option was added again, it was called the “Suggest Edits” feature.
Even in the last few years, the feature has been worked upon and has greatly improved. One person can enable the track changes in Google Docs and every tweak or edit made after that can be easily reviewed by other fellow collaborators. You do not have to make changes using different font colors, styles, highlighting colors to distinguish it from the regular text.
These changes can simply be viewed with a click once track changes in Google Docs have been accessed. Another one of its advantages is that, if there are more than two collaborators, it keeps all of the changes made up-to-date. Gone are the days when you had to worry about looking for the latest edited version or waiting for someone else to send it to you so you can continue working.
Why would one Use Track Changes?
We know that the option of track changes in Google Docs lets someone else review and add ‘suggestions’ to your content. This is especially helpful when multiple people are working on a single document. Thus, it proves to be a game-changer for collaborations. It allows the viewer to quickly go through all the changes made rather than eyeing out for every change bracketed, commented, or highlighted.
The best part about this feature is that you even have the option to either accept or decline these suggestions with a single button.
What is the Difference between the Track Changes in Google Docs and Microsoft Word?
The track changes feature in Microsoft Word works slightly to Google Docs. The viewer makes the necessary changes and editing, saves it, and forwards it to the next. Thus it works sequentially but the same feature in Google Docs works in an updated manner. The changes can be made simultaneously between all the viewers and non of them have to keep a copy to themselves. The single document is updated for everyone.
In this way, the tool of track changes in Google Docs is much more convenient to use.
How to Use the Track Changes Tool in Google Docs?
Since the Google Docs version of the tool is much more convenient to use, it is necessary that one knows how to access it. Let us go through all the steps required to perform this action.
1. How to Share Your Google Document
Before other people can access and review your document, they must have permission to open it so make sure you share it, albeit confidentially.
Here are all the steps involved in how you can share your document:
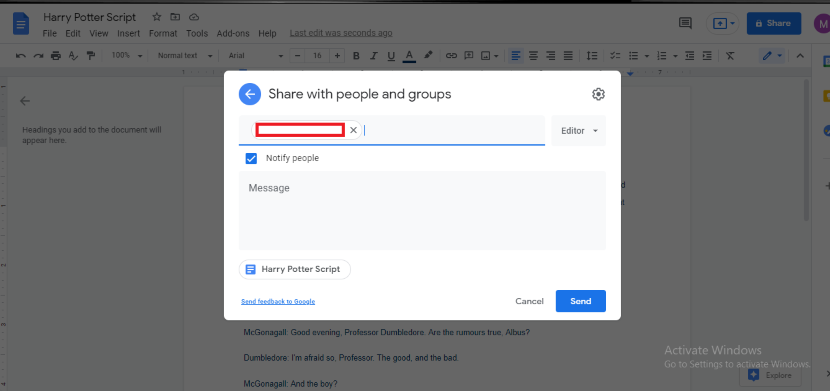
Open your document using the Google Docs application. Click on the “Share” button, on the top-right side of the screen.
A new window will pop up. Find the “Add other people and groups” option and click it. In the text box that has now appeared, type the email address(es) of the person or persons you wish to share your document with.
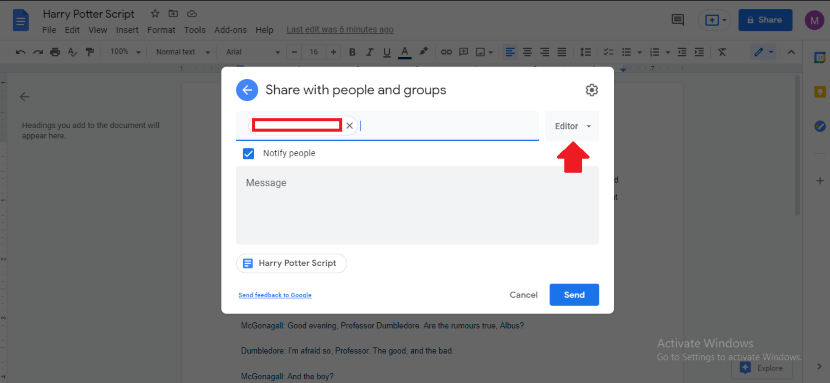
The next step is to assign the role to the added people. You can see the option next to the name of your recipient(s). The options are to be either an editor, a viewer, or a commenter. Make sure you have the “Editor” option selected.
You can choose to notify the recipient that the email has been sent with the ‘Notify’ option present under the name of the recipient.
In addition, you can add an explanatory note at the end in the “Message” box, describing the purpose of the email, and then hit the “Send” button.
2. How to Enable Track Changes
Now comes the most important step which is to enable track changes in Google Docs. There are a few ways you can track changes in your entire document. Some are niftier than others but we shall discuss them all.
a. Check your Document’s Revision History
In case you forget to turn track changes on, you can thank the “version history” option in Google Docs for saving you from any extra hustle.
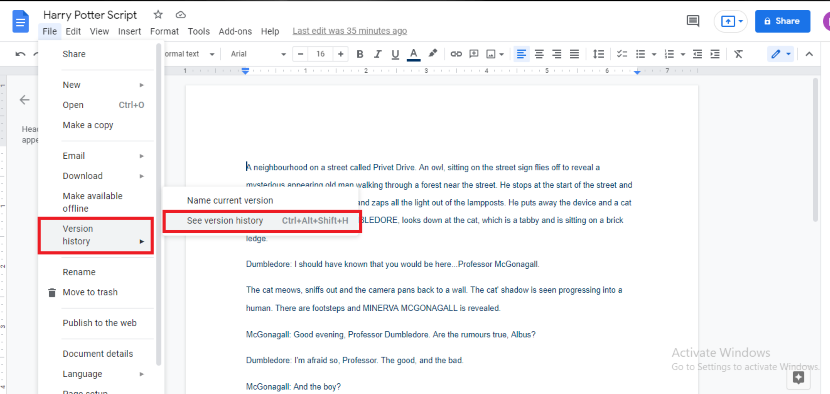
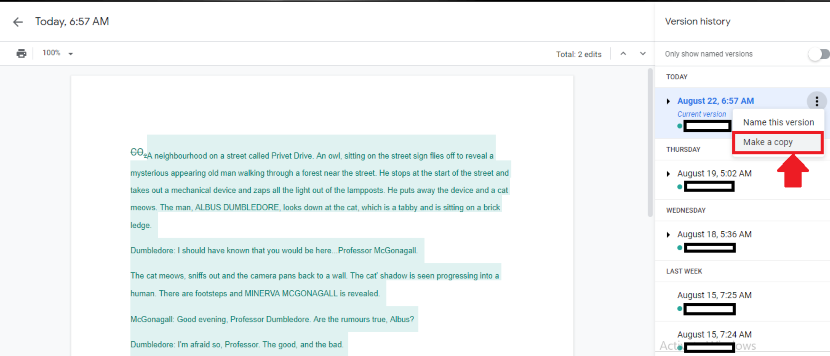
The first step would be to open your document in Google Docs. Go to “File” in the toolbar. From the drop-down menu, select “Version history” and then select the “See version history” option from the side menu.
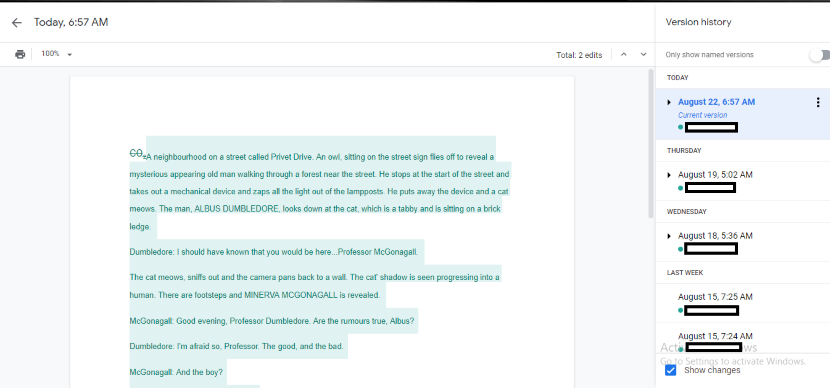
A new panel will open up on the right side of your screen. This will show you the time and date of every edit made and by which editor.
You are even presented with the option of saving a copy of every edited version with a different name. You can also make a separate copy of that specific edited version. This, you can access by clicking the three vertical dots on the panel and then choosing the option for whatever you intend to do.
If you do not wish to go through with the edits made by some author, you can also restore to an earlier document version that is most preferred. This is easy to do since all versions are saved in the above panel by Google Docs.
b. Use Suggesting Mode:
The “Suggesting” mode of Google Docs works in parallel to “Track Changes” in MS Word. Once activated, all the authors having editorial permissions can make any changes in the document. The changes made can then be easily viewed by others.
Follow these steps to activate the suggesting mode:
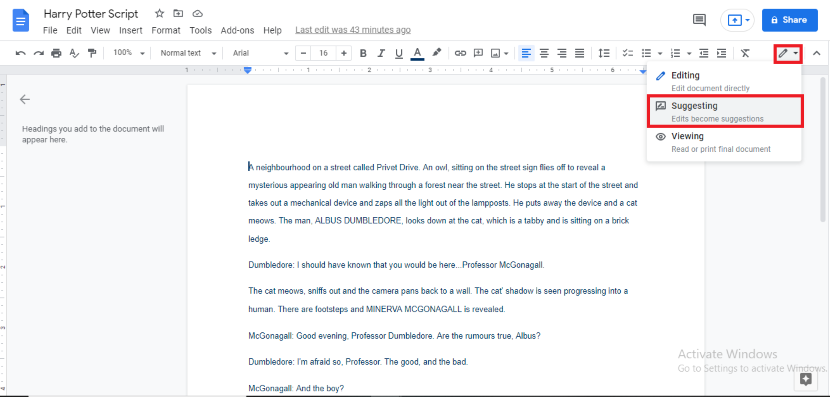
First, you open the document in the editing mode of Google Docs. You do this by clicking on the pencil icon on the toolbar in the top-right corner. This has been shown in the red box. From the drop-down menu select “Suggesting”.
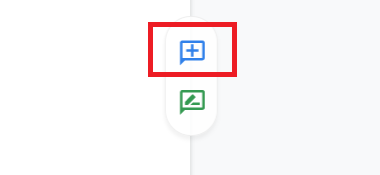
You can also access the suggestion mode by hovering over your document and clicking this green icon.

Other Considerations – Track Changes in Google Docs
There are other things that must be kept in mind while using the “Track Changes” or “Suggesting” mode. Here, we shall go over each of these considerations.
1. What to Observe in the Suggesting Mode
The feature that stands out the most with the suggesting mode is how convenient it is to view and discuss the changes made in the document by various authors.
- The edited text shows up in a different color automatically.
- All the changes show up on the right side of the document in the form of comments or suggestions.
- All the authors of the documents can make conversations on individual changes made in the entire document.
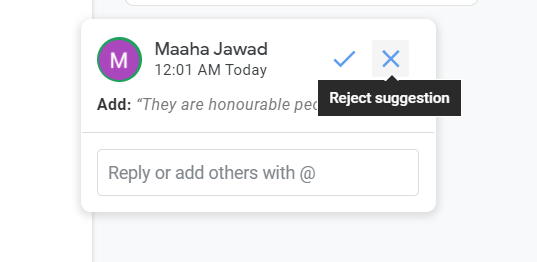
- Once a change is accepted by all the authors, you can check to click it. If you have to decline it simply click on X to reject.
2. Leaving Comments
This tool is very similar to the suggestions tool and thus, used as an alternative method to leave suggestions on the text.
You can leave comments on a particular portion of the document by following these steps:
- Open your document in Google Docs through your Google Drive (or type it out from scratch).
- Select or highlight the text upon you wish to leave a comment.
- Go to “Insert” on the Toolbar. From the drop-down menu select “Comment”.
- You can also do this by clicking on the ‘+’ that shows up on top when you hover the text.
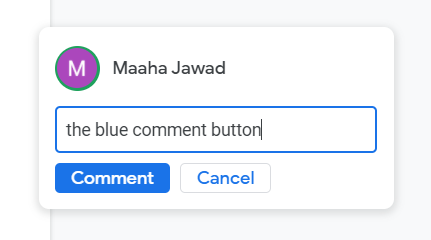
- Type the text you want to leave as a comment and click on the blue “Comment” button.
If you want to immediately alert or start a discussion with all the authors, you can @ author name or start a live chat.
3. Downloading the File as Word Document:
If you wish to view the changes in the track changes feature i.e. using Microsoft Word, you would have to save the document in that word file format. When the document opens in Microsoft Word, all the suggestions and comments made in Google Docs will be shown as track changes.
In order to save a document as a Word file, you have to:
- Go to “File” in the toolbar.
- Select “Download” from the drop-down menu.
- From the side menu select “Microsoft Word (.docx)”.
However, it is important to note that once downloaded as a Word document, you are taking the file off of the cloud storage. This means that the changes now made in the document will not show up in the earlier version saved on the cloud. This could cause confusion and errors between the authors of the content collaboration.
Hence, it is not recommended to make changes in both Google Docs and in the Microsoft Word file simultaneously. Authors and collaborators are advised to better make use of the platform Microsoft 365 which offers collaboration and cloud-based features.
Pros of Using Google Docs Suggestion Tool
Many professors and content collaborators religiously use the suggestion tool while working on an important document. Following are the reasons why:
1. Huge Way from the Revision History
Before the track changes or the suggesting mode, writers had to go to the “Revision History” of the document to view all the changes made. Not only this, they had to contrast between the current and previous documents and figure out the changes themselves at times. However, Google Docs has made viewing the changes multifold easier, as mentioned earlier in the article.
2. Saves Time
Unlike the track changes options, the suggestion edit tool shows you the edits made in the document with different color codes and shows up in revision boxes. This quickens the entire process and saves us the effort of having to scroll up and down through an entire window that only shows the edits but not where they have been made.
3. Accept/Reject All:
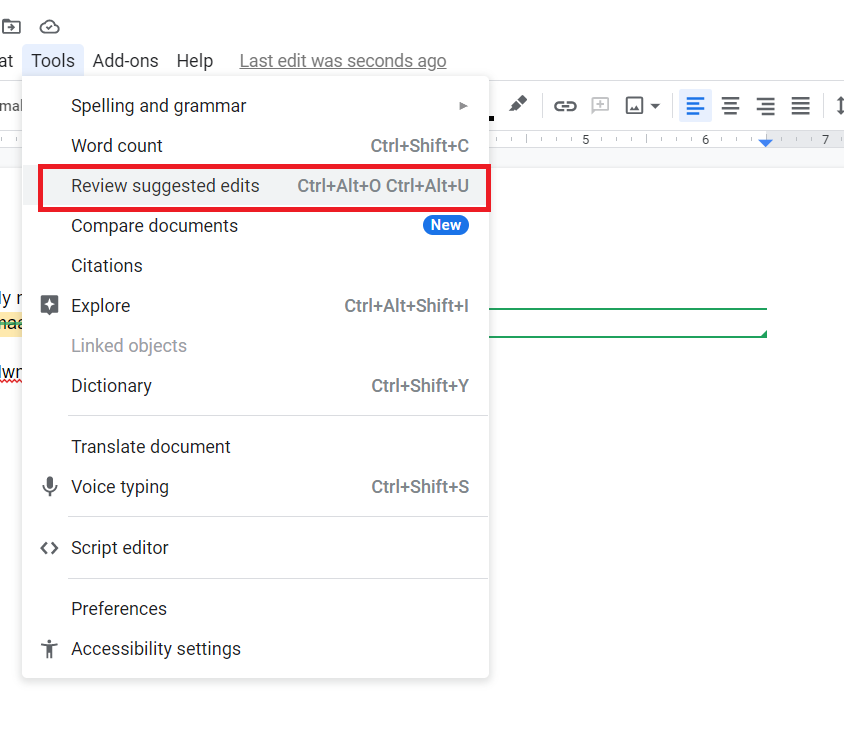
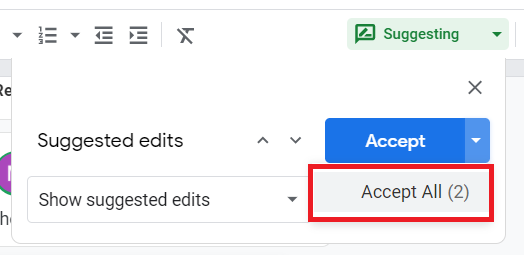
This feature lets you accept or reject all the suggestions made in one go. Users were anticipating this feature for a long time and Google Docs has finally introduced it. You can locate it in the toolbar under “Tools” and then “Review suggested edits”.
This opens up a new window to the left of the Google Docs screen by means of which you can either accept or reject all the suggested changes made by another author.
4. Identifies the Author
This identification feature recognizes which author has made what certain edit. Not only this but the comment section available makes it easier to pinpoint and discuss a certain change with all the fellow collaborators.
5. Permission Grants
The suggestions tool allows all the authors with editing privileges to make changes to the document. You can change the number of people with these editorial privileges as many times as required. Not only this, but Google Docs also lets you add team workers who can be allowed to make comments and suggestions but would not have the authority to reject or accept suggestions of other people.
You may also grant access to someone to only be able to comment (and give suggestions) but not edit.
6. Easier to Share
Unlike Microsoft Word, you do not have to save the document after every change. Once you have shared the document among your collaborators, any change you make in the document will show up for all the others automatically.
This is what it means by “Cloud Storage”.
7. Mobile Access
Previously, users could only edit their Google Docs writings on their computers. However, that is not the case anymore. You can now access your documents on google drive easily on the go on your mobile device. It does not matter if you are an android user or an iOS fanatic, all you need is a mobile device to access your documents.
The automatic saving of the document works in the same manner on your mobile.
Cons of the Suggestion Edits Tool:
In contrast to the pros, the cons are next to nothing. But nonetheless, for the sake of providing both sides of the story, here are the cons as well:
1. Internet Connection At All Times
Your Google Docs application requires you to be connected to the internet at all times for you to be able to write or edit documents on it. This is one positive Microsoft Word has over Google Docs.
2. There is No Going Back
Before you accept or decline all the suggested changes in a document, be perfectly sure as there is no going back once you click the button. The changes will also disappear from the revision history.

