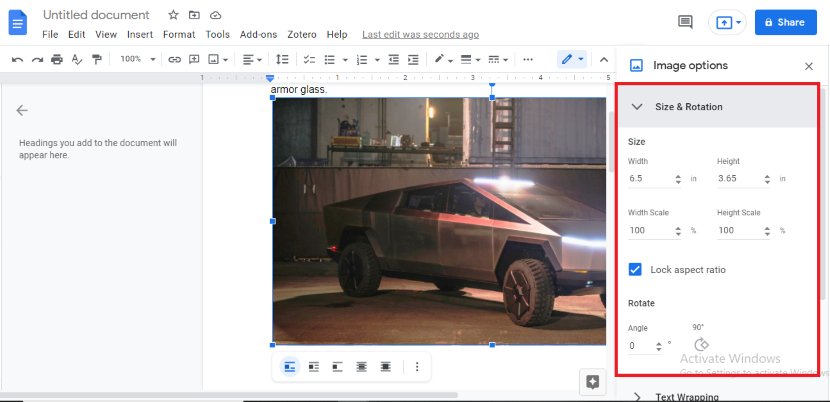
How to flip an image in Google Docs?
In this article we will teach you how to flip an image in Google Docs!
Flipping an image is similar to mirroring it. (Literally putting a mirror in front and the reflection would be similar to the image being flipped). There are a couple of ways you can flip an image; horizontally or vertically. When you flip it horizontally, the left side of the image becomes the right and vice versa. While when vertically flipped, the top of the image comes at the bottom and the bottom becomes the top.
The process of how to flip an image in Google Docs is extremely simple. You can carry this out using our easy step-wise guide. In this guide, find how to flip an image in Google Docs and much more.
Contents
How to Add Images in Google Docs?
Before we proceed with the method of how to flip an image in Google Docs, we should know how to add one. Mentioned below are a bunch of different ways through which you can add an image to a Google Docs document.
Method 1: Dragging and Dropping
The simplest way to do that is by simply dragging the desired image and dropping it in the Google Docs document. After that, you can adjust it in the document according to your aesthetics or requirements.
Method 2: Using the Insert Menu
The second most-used method is through the Insert menu in the menu bar. The first option in the drop-down menu is Image. From the side menu, you can select whether you would like to upload an already downloaded image from your local device storage or add an online URL of the image.
Once you decide where you want to pick the image from, you have to select the desired image. Clicking on it will make it will pop up wherever you have placed the cursor in the document.
Method 3: Using Image Search
Google Docs offers you a wide range of images that you can access via its search options. These images, however, are not owned by Google. Hence if you are using any image from the Google Docs library you would have to search for its source on your own for copyright claims. The library itself does try to show you Creative Commons but it is good to check the source just in case.
To do that, you can simply click the magnifying glass icon present at the bottom of the image. It will take you to the description of the image, which mentions the image’s actual source. Now, let’s discuss the process of how to add these searched images:
- Click on the document where you wish to add the image
- Go to the Insert menu from the menu bar.
- From the drop-down menu, select Search the web.

- Use keywords or similar terms to the sort of image you are looking for.
- From the list of options click on the image that sets best with the aesthetic of your document.

- Simply click on Insert to add it to your document.
- You can hit the delete key on your keyboard if you wish to remove the added image.
Method 4: Adding Images using URL
If instead of searching for an image through Google Docs, you already have found it through your browser; you can use its URL to add it to your document. Not just this, you can also use images that you have saved in your Google Drive account. Here is how you can add such images to your Google Docs document:
- Copy the URL from the address bar of the image you wish to add to your Google Docs document.
- Open your Google Docs document.
- Go to the Insert menu in the menu bar.
- From the drop-down menu, select Image.
- From the side menu, go to the option of By URL.
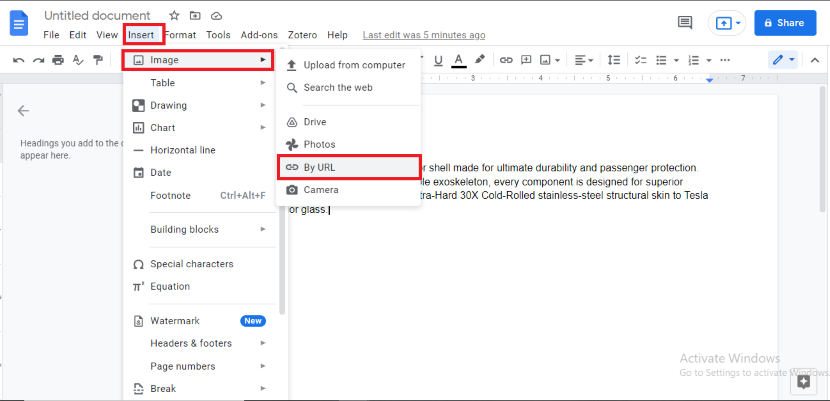
- In the given space, paste the URL address you have copied.
- You can use the shortcut keys of CTRL + V.
- Hit the now-turned blue Insert button to add the image to your document.

- Once adding the image to your document, make sure to reference it properly to avoid any copyright claims.
If you are adding images from your Google Drive account, you can follow these steps:
- Go to the Insert menu and from the drop-down menu and hover over Image.
- From the side menu that has now appeared, click on Drive.
- Select the image you want to insert from your Google Drive account.
- Hit the now-turned blue Insert button to add the image to your document.
When you select the option of Drive from the Insert menu, you will see a few columns that will display categories of your images. These can include images that you have either received or starred etc. These categories can help you look for your desired image faster.
Similarly, if you wish to add images from the Photos gallery, you can select Photos instead of Drive from the Insert menu.
How to Flip An Image in Google Docs?
Once you have added the image to your Google Docs document, you can now explore different options that come in regards to its formatting. There are a number of ways you can alter the image to make it more fitting and coherent with your writing.
In order to learn how to flip an image in Google Docs, keep reading:
Method 1: Using the Drawing Tool
Following is a step-wise guide on how to flip an image in Google Docs using the drawing tool:
- Open your Google Docs document through your Google Drive or create a new document from scratch.
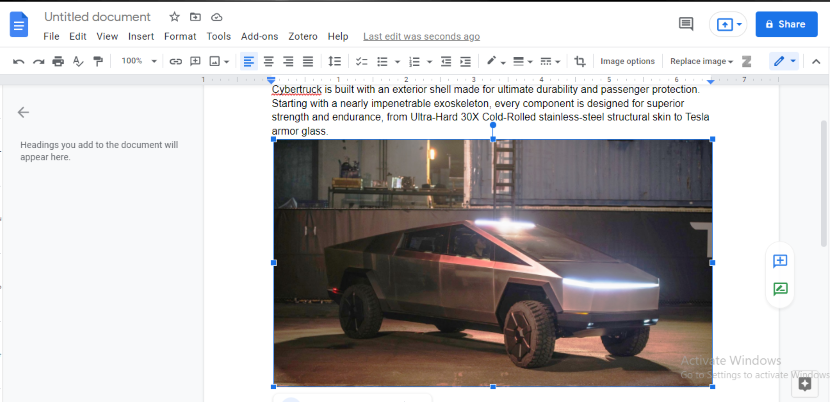
- Add the desired image using any of the methods mentioned above.
- Once the image is added, you now have to cut it (yes, seems odd but bear with it).
- You can use the keyboard shortcut Ctrl + X for cutting the image.
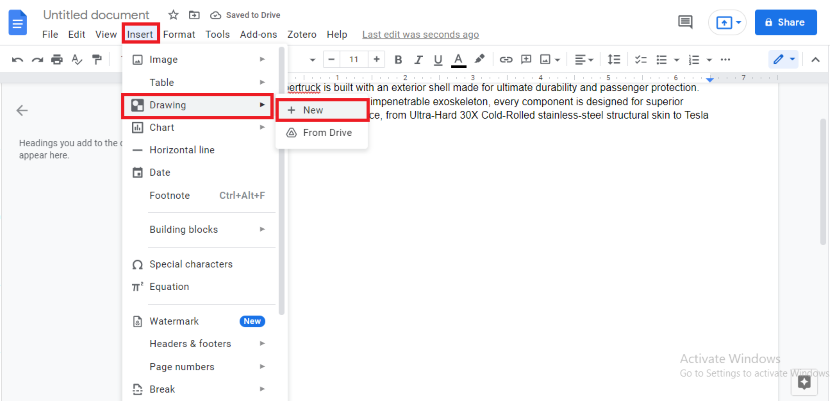
- Now go to the Drawing tool from the Insert menu.
- From the side menu, open New.
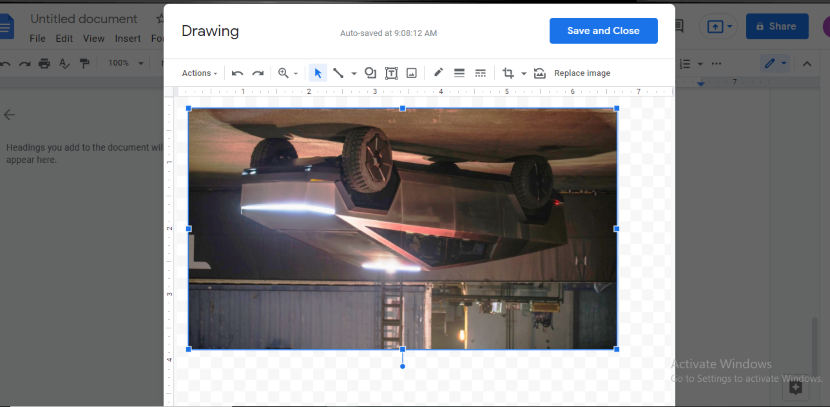
- Once the drawing window opens, paste the image you had cut. You can use the shortcut keys of Ctrl + V.
- In the drawing window, there would be an option of Actions. Click on it.
- From the drop-down menu, select Rotate.
- From the side menu, select how you want to flip your image; horizontally or vertically.
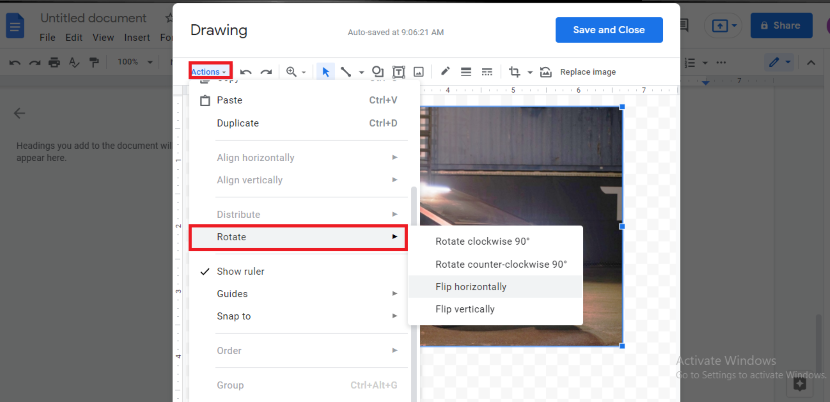
- Once you select the option you require and the image has been positioned according to your preferences, click on Save and Close.
- The image will appear flipped in the document.
- And with that, your newly flipped image will now appear in your Google Docs document. That makes one method of how to flip an image in Google Docs all done!
Method 2: By Rotating the Image
This method is only applicable if you have to rotate your image vertically. If you are looking for horizontal rotation, you would have to use the first method mentioned above. Following is a step-wise guide for how to flip an image in Google Docs using the rotating method if it does meet your requirements.
- Open your document in Google Docs.
- Now you open your image in the drawing tool.
- You can use either of the two methods; click on the image and click on Edit or go to the Insert menu and select the Drawings tool, leading to the option of New. However, if you choose the latter method, you need to paste your image into this New window.
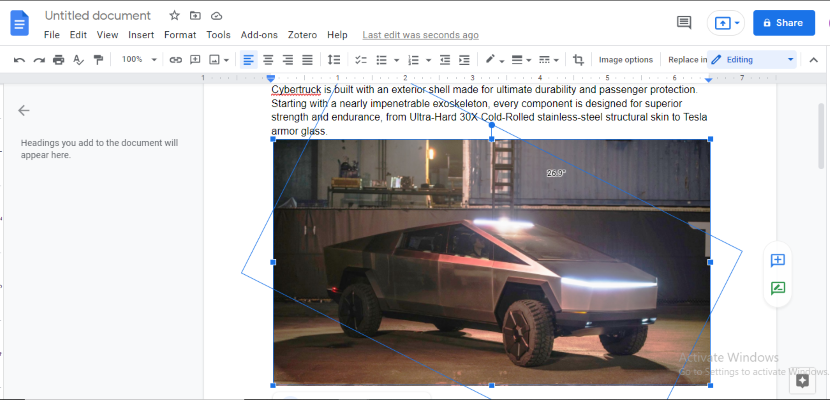
- Next up, you have to find the anchor points of the image. To do this, click on the image and you will see the anchor point at the top center of the image.
- You can now rotate the image at 180°.
- You can also left-click on the image and go to the Image options.
- From the new screen that will now appear on the right of your screen, you can select the rotating options.
- You will see two options, Rotate clockwise-90° and Rotate counter-clockwise-90°.

- Once you have your desired rotation, click on Save and Close.
- You will now see your image rotated in your Google Docs document. This marks the second method of how to flip an image in Google Docs all done!
How to Flip an Image in Google Docs Using a Smartphone?
If you prefer using your phone to your desktop when composing documents in Google Docs, we have you covered there as well. Google Docs offers you the option of image rotation through your smartphone and we provide you a step-wise guide on how to flip an image in Google Docs when using a smartphone.
The Google Docs app does not offer you the option of image flip itself. However, if you open your document in desktop mode on your smartphone, you can follow the same steps mentioned above. To open desktop view in your smartphone, here is a step-wise guide:
- Open your Google Chrome browser on your smartphone.
- Tap on the three horizontal lines on the top left corner of your screen.
- From the drop-down menu, select Desktop View.
- Your browser will now operate similarly to the operation of your PC.
- Once that is done, you can go to this site https://docs.google.com/document/u/0/ and choose either of the two methods mentioned above to flip your image.
- It goes without saying, you have to first add an image to the Google Docs document.
If the document is not clear on your smartphone as it was on your PC, you can double-space your entire text to make it more convenient. Afterward, you can bring the line spacing back to normal.
How to Flip an Image in Google Docs using an iPhone or the iPad Google Docs App?
In case you’re an iOS user then there is also an option available to you through which you learn how to flip your Google Docs image. Here is how you can do so:
- Open the Google Docs application on your iPhone or iPad.
- Go to the menu and click on More.
- From here, turn on Print Layout.
- Tap on the image that you want to flip.
- A tiny circular icon will now be made available to you. You can use this icon and drag it to rotate it.
Considering flipping an image is not exactly synonymous with rotating an image, you can use third-party image editing applications on your iPhone or iPad to flip an image and then add this image to your Google Docs document. A good option is the image editing application called Snapseed.
(Frequently Asked Question) FAQS
Q. How to edit images in Google Docs?
Sometimes adding a particular image to your document, might not adjust well with the rest of the text. To make the image compliment the rest of your document’s formatting, you can edit it a bit. Google Docs offers you a range of these editing options. If you wish to change the size of your images or crop it in a smooth manner, you can use some key positioning options.
In-Line Text: This option helps you to adjust your text with the image. The image moves along with the text.
Wrap Text: This option lets you wrap your text around the image.
Break Text: This option lets your image act as a break. This means the text only appears after the image.
In order to change the size of your image, you can click on the image and then adjust the size moving the small blue squares at the border. You can also choose to add an outline to your images. You have to click on the image itself go to the editing settings to access all of these different formatting features.
Q. How to flip an image in paint in then add it in Google Docs?
Paint has always been the go-to tool for editing pictures, especially for millennials. The native tool comes pre-installed in every Windows. You can use the software for editing and flipping images. Here is how you can flip an image in Google Docs through the paint software:
- Open your image in Paint.
- Right-click on the image.
- From the options available, select Rotate.
- Once you have successfully flipped your image, simply save your file by pressing the keyboard shortcut keys of CTRL+S.
- Now open your Google Docs document.
- Click on where you want to add your image.
- Go to the Insert menu and select the option of Upload from computer.
- Now select the image you just saved by browsing the location of that saved image.
- When you click on the image, it will emerge in your document.
The rotation options offered by Microsoft Paint are:
Rotate right 90 degrees – This option will rotate your image 90 degrees clockwise.
Rotate left 90 degrees – This option will rotate your image 90 degrees counter-clockwise.
Rotate 180 Degrees – This option will rotate your image 180 degrees.
Q. How to undo image flip in Google Docs?
Google Docs offer you a full version history, which tracks all the moves and changes you make in your document. To open the version history, you can follow the following steps:
- Click on the image you wish to flip again (to reverse the effects of the previous flip).
- You will see an edit button on the bottom of the image.
- Once you do that, the Drawing tool will open up.
- Go to Actions.
- Now head to View version history.
- This will take you to all the history and changes you have made.
- From this list, you can select the original (before the flip) version of your image. The list will be present on the right side of the Drawing tool.
- Now click on the three vertical dots.
- Click on Restore version to come back to your current version of the document.
- Once done, click on Save and Close.
Q. How to revert to the original image in Google Docs?
The easiest way to regain the original image you had added to your document is by simply pressing CTRL + Z to undo the versions of your image. When you reach the original image you can stop.
We hope you have now discovered several ways on how to flip an image in Google Docs in your computer and mobile phone! What did you learn new? Do you want to add something to this article? let us know in the comments below! we would love to hear from you!
also, check this article if you are interested in how to add page number to Google Docs!

