
‘Record the screen’ feature on your devices enable you to record a video of what’s currently playing on your screen and save it for later. Whether you are a student, an employee at a software house, a forgetful teenager or a college professor, you might wonder ‘how to record screen’ in order to save the process of completing a particular task. A series of OS providers including Apple, Windows and Google, now pre-install this feature into their operating systems for the ease of their users. It is not, however, easy figuring out how to record your screen. Let’s see how it’s done!
Contents
1. Screen Recording on Mac
Mac users are lucky, given their operators have installed a Quicktime application which is generally used to play movies on the device. It also comes with several other features, one of which is screen recording.
Quicktime
As mentioned earlier, Quicktime is preinstalled in your macOS and you do not need to install it from scratch.
- Open Finder, go to the Applications folder and choose Quicktime or simply search for Quicktime in Spotlight.
- Once you open Quicktime, choose File > New Screen Recording.
- Doing that will open a small box with a red button. Click on the red button.
- Select either all of part of the screen or just the one you want to record.
- If you want to record all of the screen, just click anywhere on the screen and the recording will start or if you want to record a specific part of the screen, just click and drag your cursor in order to make a rectangle covering the desired field.
- If you want to stop recording the screen, click on the small stop icon on the menu bar and then you will be able to review your recording.
- The video player with your screen capture will appear and you can save it by going to File > Save. Quicktime saves the videos in MOV format only. However, you can convert them into MP4 by using a conversion software.
macOS Mojave Hotkeys
If you are running macOS Mojave, you can use a combination of hotkeys to start recording your screen.
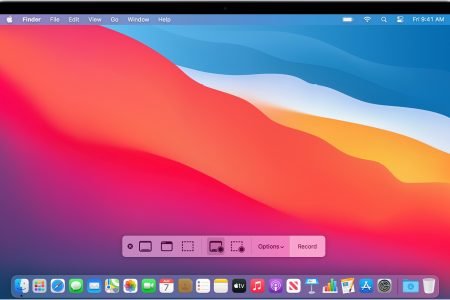
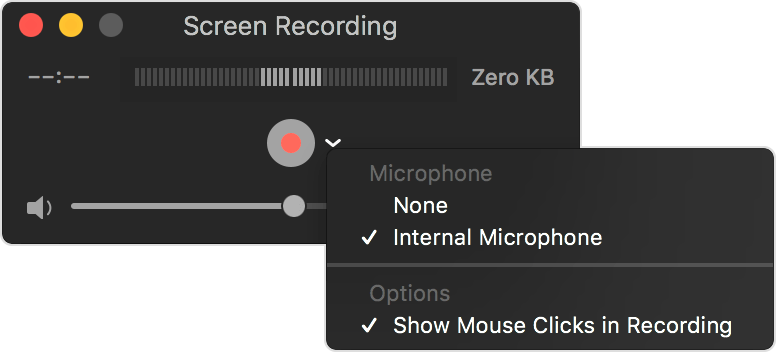
- Press SHIFT+CMD+5. A dotted outline drag box will appear.
- Once you view this box, click on one of the two recording options along the bottom bar i.e. either ‘Record Entire Screen’ or ‘Record Selection’. Select one of these and the ‘Capture’ button will turn into a ‘Record’ button and then you can start capturing your screen.
- If you select partial screen, the remaining area of the screen will be faded and only the screen being recorded will be clear. However, if you are recording the entire screen, no difference will appear.
- In order to stop the recording, click on the small stop button presented on the menu bar.
- Once you successfully stop recording, a small window will pop up from the bottom-right corner of the screen. Click it and the review the clip.
The MOV format of the clip will also be saved automatically on the desktop and you can simply open that in case you miss the pop up window. - Do not double click the pop-up window as that will send the clip to Quicktime. Instead, click it once to highlight and then press spacebar to open the preview of the clip.
- You can then edit the clip (trim or rotate) or share it.
How to record screen with ScreenFlow
Use ScreenFlow when you aim to go beyond simple recording. ScreenFlow has built-in recording and editing tools with various exciting features like callouts, special pointers, a multi-layered editing timeline, and other options that are great for marketing or educational videos.
In order to start recording and editing your videos using Screenflow, you need to download it as a 30 days free trial. Then;
- Download and install the software and when you launch it, an introductory screen will appear. Click ‘New recording’ on the left hand side.
- You will be prompted to select from the monitors (if you have multiple) to record on. You can choose the camera input if you want to include the video as well.
- Then pick from the red record button or the dotted rectangular box to start recording your screen. The former will record the whole screen and the latter will allow you to select a part of screen you want to record exclusively.
- A countdown from 5 will begin before the recording starts. Once you are done, you can click on the stop recording button on the menu bar or simply press SHIFT+CMD+2.
- The end result will be automatically added to the media library of your ScreenFlow Document. You can edit the clip or add annotations by simply dragging it to the editor.
- You can choose from a variety of video editing options like Mouse-click effects, annotations, callouts and many more.
- When the editing is done, you can export the video file to WMV, MOV or MP4 or choose from more technical choices.
How to record screen with Camtasia
Camtasia is another great downloadable software you can use to record and edit your videos on mac. In order to use Camtasia, the user first needs to buy it online. However, if you are not willing to buy it, a free trial is offered for 30 days.
- First download and install the software and once it is all finalized, you can press the ‘Record’ button to start casting your screen.
- Camtasia allows you to choose from the monitors (if multiple) and camera, and even the microphone if you tend to add live audio into the recording.
- When you are done recording, click ‘Stop’ button on the menu bar or simply press CMD+SHIFT+2.
- The recording clip will be saved in the media bin of Camtasia. You can open and edit it from there, using an extensive list of options including audio, effects, transitions and annotations.
How to record screen with Snagit
Finally, yet importantly, Snagit is a great choice for users who often need annotated screenshots and video recording software. The editor in Snagit has, however, extremely limited functionality and it is not suitable for making wide-scale projects such as YouTube videos.
It is mainly built to take screenshots and record screens, with a user-friendly interface.
- In order to cast your screen using Snagit, click Video on the left-hand side of the window and pick your recording settings. The webcam can also be used as a source to add videos.
- Press the Capture button.
- The editor will appear once you are done recording or capturing.
- You can add media, apply different filters, create helpful notations, and export files.
- However, there are no such functions available for a video. This is Snagit’s main shortcoming: you can only trim recorded videos and cannot add any annotations. This makes the software more suited to someone who uses the feature only in small doses rather than someone who produces lengthy videos.
Alternatives
There are a few alternatives to the aforementioned programs:
Filmora Scrn
Filmora Scrn is another screen recording and editing software with multiple export options and editing. It provides a clean interface but it is not free and hence, not a suitable option for everyone.
Microsoft PowerPoint
Another way to record and edit your screen is by using Microsoft PowerPoint. Just choose Insert > Screen Recording and use the Select Area tool to select the part of the screen you want to cast. You might need to update your Mac PowerPoint since older versions do not support audio for you screen recording.
YouTube Live Streaming
YouTube has an exciting pre-existing feature that lets you record your screen when you have a YouTube channel. You can use the Creator Studio’s Live Stream feature to record the screen. However, the only shortcoming is that the recording will be publically viewable so it might not be the best fit for all users.
OBS Studio
This a rather high-end screen recording and video editing software with quirks and features that an ordinary user may never use. You can change specialized settings such as the bit rate, audio sampling rate, hotkeys, etc. It is an open source program and hence, free. It can be downloaded from OBS Studio.
2. Screen Recording on iPhone/iPad
iOS 11 features a built-in function that records the screen on your device. This feature comes in handy, especially, if you want to save the work for later, want to share your gameplay with your friends, demonstrate a bug or walk someone through a tutorial of an application. All apple devices with iOS 11 and later versions hold this feature.
How to enable screen recording on iPhone/iPad
The screen recording icon is usually present in the control panel of an iPhone/iPad. If, however, it is not in the control panel, you can add it by following the steps given below:
- Open the settings app.
- Choose Control centre.
- Select ‘Customize Settings’.
- Tap the + icon next to ‘Screen Recording’ to add it in the ‘Include’.
How to record screen on iPhone/iPad
In order to start recording your screen, follow these steps:
- Swipe the control centre up.
- Touch the ‘two nested circles’ icon to start recording.
- That will be followed by a three second countdown after which your iPhone or iPad will automatically start recording your screen.
- When screen recording starts, a red bar appears on top of the screen just to notify you that the screen is being recorded at that particular moment.
How to end the recording
In order to stop the recording, follow the steps:
- Swipe up the control centre again.
- Tap the screen recording icon.
or - Tap the red bar on the top of the screen.
- Confirm that you want to stop the recording.
- The recorded video will then be saved automatically in the Photos app on your iPhone/iPad and you can review it from there.
3D touch accessing
If your device has a 3D touch feature, you can simply 3D touch on the record button in the control panel and start recording. You can also decide whether or not you want to enable microphone while recording.
3. Screen Recording On Windows
Taking a screenshot on windows is quite a simplistic process but when it comes to recording the screen and editing a video, the task can be a bit difficult. However, Microsoft has incorporated a video capture tool called Game Bar which has made it very easy.
The Game Bar interface underwent a series of updates under Windows 10 Update 2018 and the video recording and editing tools look slightly different since then.
How to enable Game bar to record screen
In order to enable the Game bar;
- Open Settings > Gaming > Game Bar.
- Turn on the switch to ‘Record game clips, screenshots, and broadcast using Game Bar’.
- Open the app or screen you want to record.
The Game Bar has certain limitations when it comes to platforms you can capture i.e. it does not capture from Windows desktop, file explorer or a few apps like Maps and Weather. Apart from this, there is a wide range of applications available to be recorded.
How to record screen with Game bar
- Press Win + G to open Game Bar. The bar panel will display options for capturing, recording and broadcasting your screen activity.
- Hit the Start Recording button to start casting your screen.
Or, simply press Win + Alt + R and the recording will begin. - Press it again to stop recording.
If you are recording the screen for the first time using the Game Bar, you will have to click the checkbox to “Enable gaming features for this app to record gameplay” and then click the Square Record button to start recording. After that, the Game Bar panel minimizes into a small floating bar on the top-right corner of the screen and you can simply click it to view options and control the recording.
In order to stop the recording, click on the floating bar and press the record button. Doing that will notify you that the clip has been recorded and show you the location of the saved file. Click the notification and it will take you to the location of the file. You can double click it to open the file and preview it. You can always change the destination for saved files by going to Settings > Gaming.
How to record screen in the background with Game bar
Sometimes you wish that you had recorded an activity you have just performed on your computer. Well, Game Bar has got you covered. It enables you to capture the last 30 seconds of the screen activity of the task you have already completed.
In order to do that, simply;
- Go to Game Bar > Settings.
- Scroll down the settings and check the box to ‘Record in the background while I’m playing a game’.
Now you will never miss the last 30 seconds of your screen activity. The number of seconds can be changed by going to Settings > Gaming.
How to start live broadcast
You can broadcast the live feed of your screen activities if you have an Xbox live account. In order to begin,
- Click ‘Start Broadcasting’ button on the Game Bar. You need to be logged into your Xbox live account to start broadcasting. However, if you are not, you will be prompted to sign in first and then start your recording.
- The live feed can be previewed in the small preview window. The options for your microphone and camera can also be viewed from the Game Bar panel.
- To stop the broadcasting, simply click the Stop button.
How to view your captures
To view the captures, you can always go to the destination folder you selected for your saved items. Moreover, the saved clips can also be reached directly from the Game Bar. Click the command ‘Show all captures’ under the control panel to open a file window.
How to record screen using PowerPoint on Windows
The screen can quite easily be recorded using Microsoft Office’s PowerPoint:
- Open PowerPoint and click the Insert tab.
- Click the ‘Screen Recording’ button located on the far right of Media panel.
- A tool bar will appear on top of your screen. You can choose whether you want to record the entire screen or a partial screen, based on requirement.
- Click the red ‘Record’ button, or simply press Windows + Shift + R keys simultaneously.
- After pressing the record button, the recording will begin and the button will change into a pause button which you can use to pause the recording at any time.
- To stop the recording, click the ‘Stop’ button and the capture will end.
- In order to save the recording, right-click on the recording appeared on the screen and click ‘save-as’ in the pop-up menu.
Alternate offline applications
If you deem to record and edit your screen on Windows in a more professional manner, there is a list of offline apps you can use. You can download any of the apps given below and start recording and editing your work, professionally.
OBS studio
OBS studio is a free application that can be downloaded at any time. It is able to do unlimited full-screen recording without water marks. It has built-in streaming functions for those who want a live audience while recording. Great hardware support enables 60-frames-per-second videos.
Snagit
Snagit is another application you can use for the same purpose. However, it entertains startups more than the gamers. It features numerous exciting features you can use to display your work. Snagit could be a great option for you if you aim to make a video that includes several video types, multiple graphics, and screen recording. It is, however, not free and the user is required to pay as much as $50.